
How to Build Bigger Calves
Transform your calves with effective exercises, optimal frequency, and proven rep ranges for growth
The Ultimate Guide to Building Bigger Calves
Best Exercises, Frequency and Rep Ranges
The Truth About Calves
(and Why Yours Aren’t Growing… Yet)
Let’s be honest—training calves is one of the most neglected parts of the average gym routine. For many, they’re treated like an afterthought: a few rushed sets at the end of leg day, usually with minimal focus and even less intensity. Sound familiar?
But here’s the thing—calves are one of the most stubborn muscle groups on the body, and if you’ve ever stared down at your legs after months (or years) of lifting and thought, “Why won’t these things grow?”, you’re not alone
You might be squatting heavy, deadlifting like a beast, and hitting your hamstrings and quads with everything you’ve got—but somehow your calves still look like they missed the memo. It’s frustrating, demotivating, and can feel downright hopeless at times.
Here’s the good news: it’s not your fault—it’s your approach. Calves aren’t going to grow from going through the motions. They need a focused plan, specific strategies, and the right mix of frequency, volume, and intensity to finally break through the plateau.
This comprehensive yet easy-to-read guide will help you understand why calves can lag and how to overcome it. We’ll cover everything from calf muscle anatomy and biomechanics to the best exercises, recovery protocols, a sample 6-week training plan, long-term training strategies, and even nutrition tips to support muscle growth. By the end, you’ll have a clear action plan to turn those stubborn calves into a new strength!
A Personal Note...
In the early stages of my training career—a long, long time ago—I honestly thought I was never going to get myself a decent pair of calves. They looked skinny, underdeveloped, and no matter what I did, they just weren’t budging an inch. I know exactly how it feels to have zero genetic advantage in the calf department.
But after years of training them consistently and smartly, I can proudly say I’ve built some well-shaped, solid calves. Are they the biggest in town? Not even close. But they’re clearly well-trained and nicely defined, and people notice.
The good news? You can absolutely build a great pair of calves too. It takes time, strategy, and persistence—but one day, you will earn the rewards.
Introduction: Understanding Your Calf Muscles: Anatomy & Fiber Types
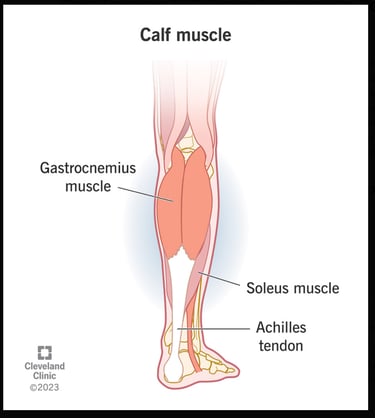
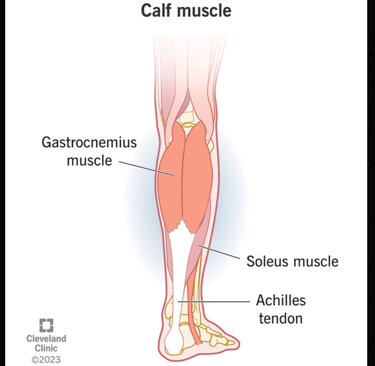
Illustration: The calf muscles on the back of the lower leg include the
gastrocnemius (the large, two-headed muscle visible externally) and
the soleus (a flat muscle beneath it). These muscles merge at the
Achilles tendon, allowing you to stand on your toes and jump.
Your calf isn’t just one muscle – it’s primarily two big players (plus some smaller helpers). Knowing their anatomy and fiber makeup will explain why you should train them differently:
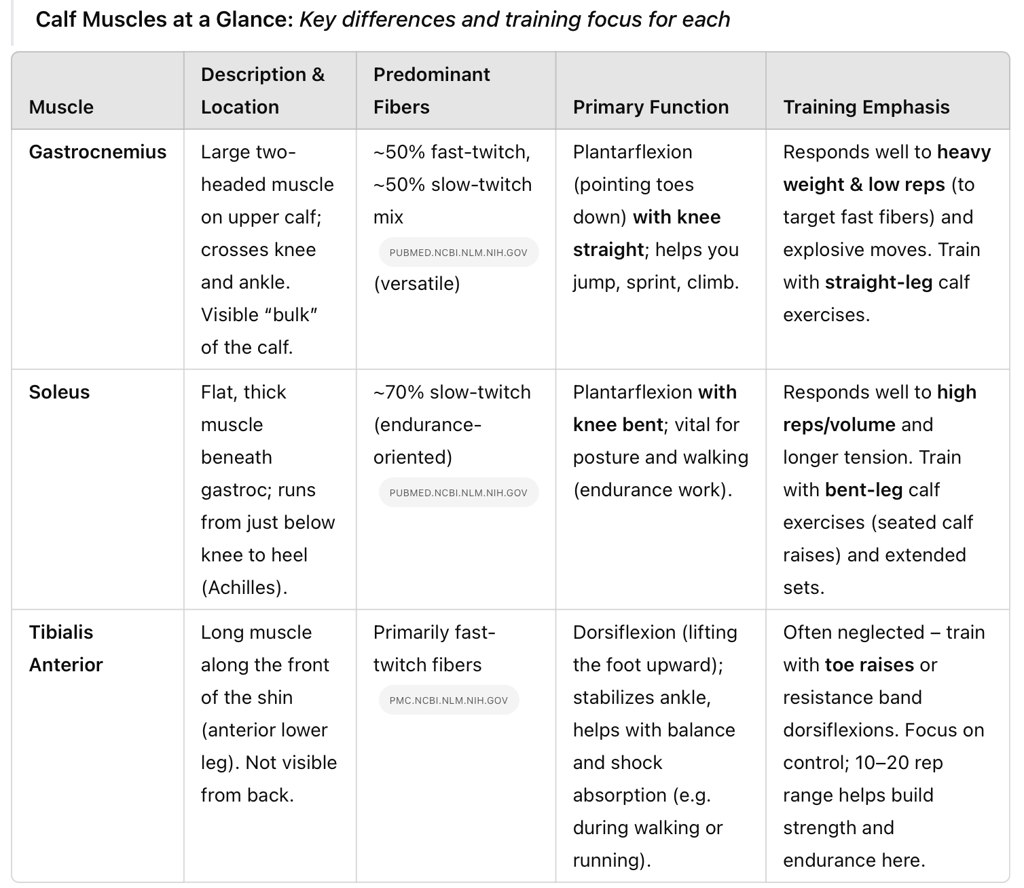
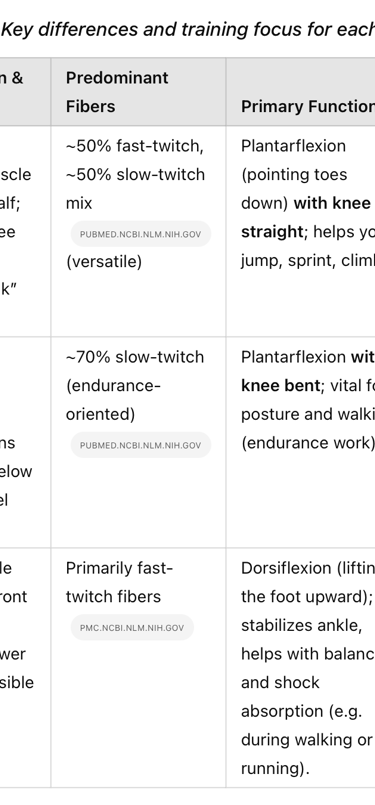
Gastrocnemius: This is the big, rounded muscle you see when you flex your calf. It has two heads (inner and outer) that start above the knee and join into the Achilles tendon. The gastroc is a power muscle used in explosive movements like jumping and sprinting. It crosses both the knee and ankle joints, meaning its function is affected by knee position. It contains a roughly even mix of muscle fiber types (~50% slow-twitch endurance fibers and ~50% fast-twitch power fibers). Fast-twitch fibers help it produce force quickly, so the gastroc tends to respond well to heavier loads and lower rep ranges.
Soleus: This muscle sits underneath the gastrocnemius and is not as visible, but it’s crucial for standing and walking. The soleus starts below the knee and also attaches to the Achilles tendon. Unlike the gastroc, the soleus only crosses the ankle joint (not the knee). It’s a true endurance muscle – studies show the soleus is about 70–80% slow-twitch fibers, built for stamina and postural support. Ever wonder why you can walk around all day without your calves burning out? Thank your soleus. Because it’s so slow-twitch dominant, the soleus often responds best to higher reps, lighter weight, and longer time under tension (think of how it works constantly when you stand or walk).
Tibialis Anterior: Don’t forget the muscle on the front of your lower leg (along your shin). The tibialis anterior isn’t part of the calf muscle group per se, but it’s the opposing muscle that dorsiflexes the ankle (lifting your toes toward your shin). It’s important for balanced lower-leg development and ankle stability. The tibialis anterior is composed largely of fast-twitch fibers, which means it can benefit from strength work as well. Training this muscle (with “toe raises” or dorsiflexion exercises) can improve overall performance and help prevent issues like shin splints.
Why fiber type matters: In simple terms, fast-twitch muscle fibers (like much of your gastroc and tibialis) excel with heavy weight and explosive efforts, while slow-twitch fibers (like most of your soleus) handle fatigue and volume well. This is why a well-rounded calf program uses a mix of rep ranges and training styles. For example, the gastroc might grow more if you challenge it with heavy sets of 6–10 reps, whereas the soleus might need sets of 15–20+ reps to really get fatigued. Understanding your calf anatomy will guide our exercise choices and how we program them for maximum growth.
Takeaway: The gastrocnemius and soleus (together known as the triceps surae) work as a team for plantarflexion (raising your heel). But because of their anatomy and fiber makeup, you need both heavy/low-rep and light/high-rep training to fully develop your calves. Meanwhile, including some tibialis anterior work will round out your lower leg strength and stability.
Calf Training Biomechanics:
How Ankle & Knee Position Affect Muscle Activation
Training calves isn’t just about doing endless reps – how you perform the exercise (especially your knee angle and ankle movement) will determine which muscle you hit hardest. Let’s break down a few key biomechanics principles for smarter calf training:
Straight-Knee vs. Bent-Knee Exercises: If your leg is straight (knee extended) during a calf raise, both the gastrocnemius and soleus are working. If your knee is bent (like in a seated calf raise), the gastroc is put in a slack position and contributes less, meaning the soleus does most of the work. In practice, this means standing calf raises (straight knee) emphasize the gastroc more, while seated calf raises (bent knee) target the soleus. EMG studies show that gastroc muscle activity drops significantly when the knee is deeply bent, whereas soleus activity stays about the same regardless of knee angle. Bottom line: incorporate both straight-leg and bent-leg calf exercises to fully train both muscles – don’t rely on just one movement. (As one sports physio quipped: “Why not both?”).
Ankle Range of Motion (ROM): The calf muscles are strongest at the top of a calf raise (when you’re on your tip-toes), but to maximize growth you also want a deep stretch at the bottom. Using a step or block under the balls of your feet lets your heels drop lower than your toes at the bottom of the rep, increasing the stretch on the calves. This stretch stimulates the muscle fibers (and Achilles tendon) more and can lead to greater hypertrophy stimulus – many experts believe that the eccentric stretch under load is a big driver of muscle growth.
Tip: At the bottom of each rep, allow your heel to sink down until you feel a good stretch (but not pain) in the calf, and pause briefly. This controlled stretch (rather than bouncing) will engage more muscle fibers. In fact, holding that stretched position for a second or two can make your calf workouts more effective (just be ready for some soreness if you’re not used to it!).
Foot Position and Targeting: You might have heard that pointing your toes inward or outward can work the “inner” or “outer” calves. There is some truth to this: a slight toe-in angle places more emphasis on the inner head of the gastrocnemius, while a slight toe-out angle hits the outer head a bit more. The difference isn’t huge, but you can experiment with foot angles to ensure you’re not missing any portion of the muscle. Just keep the angle subtle (about 15–20° in or out) to avoid twisting your knee. The Achilles tendon will transmit force to both heads regardless, but rotating your hips/feet can shift which head of the gastroc feels the most tension.
Tempo and Control: How you perform each rep matters. Many lifters make the mistake of doing calf raises too fast – bouncing up and down uses momentum (and the Achilles’ elastic recoil) instead of muscle contraction. Focus on a controlled rise and controlled descent. A good rule of thumb is a 1-2 second lift, a brief pause at the top(squeeze the muscle), and a 2-3 second lower into the stretched position. Slowing down the eccentric (lowering phase) in particular helps maximize muscle fiber engagement and growth stimulus. Once you’ve built a solid foundation, you can introduce explosive reps occasionally (like jumping calf raises or plyometrics) to train power, but the bulk of your calf work should be controlled for best results.
Key Point: Use full range of motion and adjust your knee angle to target different muscles. For well-rounded calves, perform at least one straight-leg exercise (for the gastroc) and one bent-leg exercise (for the soleus). Stand on a step or platform to get a deep stretch at the bottom of each rep, and control the movement without bouncing. Small tweaks like foot positioning and tempo can further fine-tune which fibers you hit. Master the form, and you’ll get much more out of every rep.
Best Calf Exercises and How to Do Them
Now that you know the anatomy and mechanics, let’s dive into the bread and butter: exercises for bigger calves. Here are the key moves, with tips on proper form and what to avoid.
Standing Calf Raise (Straight-Leg Calf Raise)
What it is: The classic calf exercise. You can do this on a machine, with a barbell or dumbbells, or even just bodyweight on a step.
Muscles targeted: Primarily gastrocnemius (because your knee is straight), and also the soleus to a lesser degree.
How to do it:
Stand with the balls of your feet on the edge of a step or platform (or flat on the floor if no step, but a step gives better range). Feet about hip-width apart, toes pointing forward (neutral). Hold onto something for balance if needed.
Keep your legs straight but not locked (a soft knee). Let your heels drop down to feel a stretch in your calves.
Press through the balls of your feet to raise your heels as high as possible. Go up until you’re on your tip-toes, contracting your calves.
Pause at the top briefly, then lower slowly. Control the descent until your heels are below the step level (or as low as comfortable on floor) for a deep stretch. Repeat for reps.
Form tips: Keep your core engaged and torso upright (don’t lean forward or hunch over). Imagine pushing the floor away with your toes. Maintain balance – it helps to lightly hold a wall or machine for stability, especially if using weights. If using a machine with shoulder pads, ensure it’s set to your height so you can stand tall under it.
Reps/sets: Because standing raises hit the fast-twitch-heavy gastroc, you can go fairly heavy. Typical ranges are 6–15 reps for 3–4 sets. Beginners might start with just bodyweight for higher reps (15–20) to learn full range of motion, then add weight. More advanced lifters can load up a barbell or machine for 8–12 slow, heavy reps. You can also do high-rep burnout sets occasionally (20–30 reps) to fully fatigue the muscle – mix it up and find what your calves respond to.
Seated Calf Raise (Bent-Leg Calf Raise)
What it is: A calf raise performed sitting down, usually on a dedicated seated calf raise machine or by holding a weight on your knees.
Muscles targeted: Primarily the soleus (because knees are bent, taking the gastroc somewhat out of play). Gastroc will still work a bit, but the soleus does the heavy lifting here.
How to do it:
Sit on the machine and place the balls of your feet on the platform, with your knees under the pad (or if improvising, sit on a bench with feet on a step and a heavy dumbbell or barbell resting across your thighs). Knees should be bent about 90°.
Starting with heels down, push through the balls of your feet to raise your heels as high as you can (you’ll feel your calf contract low near the Achilles).
Pause at the top, then lower your heels slowly back down below the platform level to stretch the soleus. Repeat.
Form tips: Don’t let your heels bounce – control the movement. Keep your knees roughly 90°; if you let them straighten too much, you shift tension back to the gastroc (which you might not want if focusing on soleus). Also, avoid lifting your butt off the seat or rocking – only your calves should be moving the weight.
Reps/sets: The soleus loves endurance, so slightly higher reps (15–20, even up to 25) and multiple sets (3–4 sets or more) work well. You can use a challenging weight, but because the range of motion is small, focus on really feeling the burn in the lower calf. A common approach is to do seated raises after heavier standing raises to thoroughly fatigue the soleus with high reps.
Donkey Calf Raise
What it is: An old-school variation where you bend over at the hips (like a “donkey”) and do a calf raise with a weight or partner providing resistance on your lower back/hips. Many gyms have a donkey calf machine now.
Muscles targeted: Similar to standing calf raise – gastroc emphasis – but the bent-over position can allow a greater stretch and may reduce cheating by preventing you from using other muscles. Both gastroc and soleus are worked.
How to do it:
Bend at your waist roughly 90° and hold onto a bench or bar in front of you for support. Keep your legs straight (not locked). Have a partner sit on your lower back/hips, or use a dip belt or machine pad for resistance.
Perform a calf raise by pushing up on your tip-toes, then lowering your heels down as far as possible. The form is essentially like a standing calf raise, just with your torso horizontal.
Keep your core tight to support your back in this position.
Form tips: Ensure the resistance is centered (if a partner is used, they should sit evenly). Don’t arch or round your back – maintain a neutral spine as you perform the raises. If using a machine, adjust the pad to be comfortable on your lower back/hip area.
Reps/sets: Similar to standing raises – moderate to heavy for 8–15 reps works well. The donkey raise often gives an intense stretch; some people feel a better contraction in the gastroc with this angle, so it can be a great addition or alternative to standing raises.
Leg Press Calf Press (Calf Extensions on Leg Press)
What it is: Using a leg press machine to do calf presses. You keep your legs straight (knees not locked) and press the sled with just your ankles. This is basically a seated version of a standing calf raise, using the leg press for resistance.
Muscles targeted: Gastrocnemius and soleus (straight-knee position, so more gastroc focus, but both work).
How to do it:
Sit in the leg press and position your feet shoulder-width on the platform, toes pointing forward. Slide your feet so that only the balls of your feet are on the platform (heels hanging off). Be careful with your foot position so you don’t slip.
With legs straight, push the platform by extending at the ankles (calf raise motion). Go until your toes are pointing and calves fully contracted.
Then allow the platform to slowly push your toes back toward you, lowering your heels as far as you safely can for a stretch (ensure the safety stops are set to catch the sled if needed!).
Repeat the calf press for reps, just like a standing calf raise but lying down.
Form tips: Keep your knees mostly locked in place (a tiny bend is okay to avoid joint lockout). Don’t bend at the hip or knee – movement should be only at the ankle. Use a spotter or safety pins, especially if going heavy, since your calves can fatigue and you want to avoid dropping the sled. This setup is great for really heavy calf work because the machine provides stability and safety.
Reps/sets: Can be used for heavy low reps (6–10) since you can pile plates on, or for higher reps (15–20) burnouts. Adjust the weight accordingly. Many lifters do a pyramid: heavy weight for 8 reps, then drop some weight and do 15 reps, etc., to cover multiple rep ranges.
Bodyweight Single-Leg Calf Raise
What it is: A unilateral (one-legged) calf raise using just your body weight (or holding a dumbbell for extra load).
Muscles targeted: Both gastroc and soleus of the working leg. Because it’s one-legged, you effectively double the load on that calf compared to a two-leg raise, which makes it quite challenging.
How to do it:
Stand on one foot on a step (hold onto something for balance with one hand). The other foot can be hooked behind your ankle or just lifted off the step.
Perform a calf raise on the single leg: push up as high as you can, then lower down until your heel drops below the step.
Do all reps on one side, then switch.
Form tips: This is harder than it looks if you go slow and deep. Use your free hand on a rail or wall for balance, especially as you fatigue. If you can easily do more than 20 on each leg, hold a dumbbell in your other hand for added weight. Keep the movement strict — no bouncing or tilting. Focus on that mind-muscle connection in the calf.
Reps/sets: Aim for 10–15 controlled reps each leg. If you can’t get at least 8 with good form, use assistance (lightly push with the other foot for a boost, or do two-leg raises until stronger). 2–4 sets per leg can finish off your calves nicely, especially after bilateral exercises. This move is also great for fixing imbalances (if one calf is weaker, one-leg work will shore it up).
Tibialis Anterior Raises (Toe Raises)
What it is: An exercise for the front of your lower leg (the shin muscles). Often done with bodyweight by leaning against a wall, or using a resistance band or a specialized tibialis machine/strap.
Muscles targeted: Tibialis anterior (along the shin).
How to do it (bodyweight variation):
Stand with your back against a wall, heels 6–12 inches away from the wall. Keep your butt and upper back touching the wall.
Flex your ankles to lift your toes and the balls of your feet off the ground, while your heels stay planted. Essentially, you’re doing the opposite of a calf raise.
Lower the toes back down under control. You should feel the muscle next to your shin contract on each lift.
Form tips: Start with feet hip-width. You can adjust distance from the wall to make it easier or harder (farther = harder). Don’t let your knees bend; keep legs straight. Move through the ankle joint, lifting toes up as high as possible each rep. If bodyweight gets easy (you can do 20+ reps), add resistance by holding a dumbbell between your feet, using a heavy resistance band hooked over your toes, or using a tibialis bar/device if available.
Reps/sets: High reps are usually best here (15–25 reps for 2–4 sets) because the tibialis is used to a lot of low-intensity work during walking. You’ll likely feel a burn in the shin area – that means it’s working. Strengthening this muscle will not only give your lower leg a more balanced look but can improve ankle stability and help prevent shin pain from running or jumping.
Common Mistakes in Calf Training (and How to Fix Them)
Even with the right exercises, bad form or habits can stall your calf growth. Avoid these common calf training mistakes:
Bouncing Reps (Using Momentum): This is the #1 calf-training sin. Dropping quickly and rebounding at the bottom of a calf raise turns it into a pogo-stick movement, relying on the Achilles tendon’s elastic rebound instead of the muscle fibers. It might let you do more weight or reps, but it cheats your calves out of the work – and increases injury risk. Fix: Slow down! Pause for a moment at the bottom of each rep (imagine “deflating” the bounce) before lifting. This ensures the muscle initiates the next rep, not momentum.
Partial Range of Motion: Some people do quick pulses or half-reps, never getting a full stretch or full contraction. Calves often respond best to a full ROM – that means heels down all the way and up all the way. If you only do the top half, you miss the stretch stimulus; only the bottom half, you miss the peak contraction. Fix: Use a slightly lighter weight if needed, and focus on achieving maximum range each rep. Stand on a block for more range. Every rep should feel like a deep stretch followed by a strong squeeze at the top.
Leaning Forward or Backward: When doing standing calf raises, leaning too far (often to counterbalance heavy weight) can take tension off the calves and even strain your back. Similarly, on seated raises, some people hunch or slouch. Fix: Maintain good posture – chest up, shoulders back, and abs tight. Use your hands for balance if needed. If you’re leaning because the weight is too heavy to control, drop the ego and reduce the load.
Going Too Fast: Calves won’t grow if you just jolt them up and down. A rapid-fire approach often means skipping the mind-muscle connection. Fix: Control the tempo. Especially on the lowering phase, go slow (2-3 seconds down). Feel the stretch, then drive up. A slower rep will recruit more muscle fibers than a fast, jerky one. Once you’ve built a base, you can introduce some faster or plyometric calf work, but never at the expense of proper form in your main sets.
Inconsistent Training / Low Volume: Another mistake is simply not training calves enough. Calves are accustomed to daily activity (walking, etc.), so training them once a week for a few sets often isn’t enough stimulus. Many people also throw a few calf raises at the end of a workout with whatever energy is left – not exactly a recipe for growth. Fix: Treat calves like any other major muscle group. Train them with intention and sufficient frequency/volume. For most, that means hitting calves 2-3 times per week with several sets each time. You might do them after another workout (e.g., after leg day or upper body days) or dedicate a short session just to calves. The key is consistency and progressive overload, not random occasional effort.
Ignoring the Soleus or Tibialis: Focusing only on standing calf raises (gastroc) and neglecting seated raises (soleus) or tibialis work can leave growth on the table. The calf is a group of muscles – all need attention. Fix:Make sure your routine includes both standing and seated variations to hit gastroc and soleus. Also consider adding tibialis anterior exercises, especially if you’ve had issues like shin splints or want to maximize lower-leg development.
By avoiding these mistakes and using proper form, you’ll ensure that each rep actually counts toward building your calves – rather than just bouncing through the motions. Quality beats quantity here. If you’re ever unsure, perform calf raises in front of a mirror or record a video to check your form.
Recovery and Mobility: Taking Care of Your Calves
Your calves may be tough, but they still need recovery and care to grow. In fact, because calves get used so frequently in daily life, it’s easy to overwork them without realizing. Here’s how to optimize recovery and avoid overtraining your calves:
Rest & Frequency: While calves can handle relatively frequent training (thanks to that endurance-oriented soleus), they still require rest to actually rebuild stronger. Aim for at least 48 hours of rest between intense calf sessions. For most people, training calves 2-3 times a week is plenty. If you’re really focusing on calves, you might do up to 4 days a week temporarily (splitting volume), but listen to your body. Remember that muscles grow during rest, not during the workout. If you ever feel your calves are chronically sore or your performance is dipping, it might be a sign to back off a bit (more on overtraining in a moment).
Stretching: The calves are prone to tightness, especially if you wear heeled shoes often or sit a lot (which shortens the calf muscle). Regularly stretching your calves can improve ankle mobility and help with muscle recovery. A classic stretch is the wall calf stretch: lean into a wall with one leg back and heel on the ground to stretch the gastroc (knee straight), and then bend the back knee slightly to target the soleus. Stretch post-workout when muscles are warm, and even on off-days. Maintaining flexibility will allow a better range of motion in your exercises (and better ROM = better gains!). As one fitness source put it, stretching is crucial as it prevents cramping and loss of flexibility in the calf – it’s a small time investment that pays off in performance.
Soft Tissue Work (Foam Rolling & Massage): Calf muscles can get knotty and stiff. Using a foam roller, massage stick, or even a lacrosse ball on your calves can help loosen tight tissue and improve blood flow. Roll the entire calf (gastroc and soleus) gently, especially after workouts. This can reduce soreness and improve how the muscle feels and moves. In fact, doing some foam rolling before and after training is a great idea if you have particularly tight calves. If you get frequent calf cramps, gentle massage and ensuring proper hydration (see nutrition section) can help.
Signs of Overtraining: Be on the lookout for signs that you’re pushing your calves (or yourself) too hard. Warning signs of overtraining can include: persistent soreness that doesn’t improve with rest, nagging injuries (like a strain or Achilles tendon pain that won’t heal), or a drop in performance/strength despite continued training. If your calves feel weaker, or your numbers are going down over a few sessions, it may be time to dial back and recover. Other general signs include fatigue, poor sleep, irritability, or loss of appetite – your body has a way of telling you it’s overstressed. What to do if you suspect overtraining? Take a deload week (lighten the load or skip direct calf work entirely), focus on sleep and nutrition, and let the tissues heal. It might feel like losing progress, but it’s the opposite – recovering well sets you up for bigger gains long-term.
Additional Recovery Tips: Ensure you’re getting enough sleep (this is when growth hormone spikes and muscles repair – aim for 7-9 hours). Consider alternating hard and easy days for calves: for example, if you do a heavy weighted calf workout one day, do a light bodyweight-only routine or just stretching the next time. Heat therapy(like warm baths) can relax muscles, and compression sleeves for calves can aid blood flow for recovery if you find it helpful. Every individual is different, but the principle is universal: a well-recovered muscle will perform better and grow more than an overworked, fatigued one.
Take care of your calves outside the gym, and they’ll reward you with better results from your training. It’s all about the balance of stress and recovery – challenge the muscles, then give them what they need to rebuild.
Sample 6-Week Progressive Calf Growth Plan
Enough theory – let’s put it into practice with a sample calf-focused routine! This 6-week progressive plan is designed to prioritize calf development for a lifter whose calves are a weak point. It incorporates multiple exercises, varied rep ranges, and gradually increases intensity or volume. You can add these workouts to the end of your regular training days or do them as short calf-specific sessions. Adjust weights according to your level, but keep the effort challenging.
Overview: We’ll train calves twice a week in Weeks 1–2, then increase to three times a week in later weeks for more stimulus. Each week, we’ll tweak the sets/reps or add weight to keep progress moving (progressive overload). Remember to use excellent form – quality reps over quantity!
Week 1–2: Foundation Phase
Goal is to establish a baseline without excessive soreness. Focus on full range of motion and perfect technique.
Frequency: 2 calf workouts per week (e.g., Monday and Thursday).
Workout A:
Standing Calf Raise – 3 sets of 15 reps (bodyweight or light weight).
Seated Calf Raise – 3 sets of 20 reps (moderate weight).
Tibialis Anterior Toe Raises – 2 sets of 15-20 reps (bodyweight).
Notes: For standing and seated raises, use a slow tempo and pause at the bottom stretch. Choose a weight that leaves you with about 2-3 reps “in the tank” on each set (don’t go to complete failure yet). The tibialis raises will balance the ankle muscles – you can do these against a wall or with a band.Workout B:
Single-Leg Calf Raise (bodyweight) – 3 sets of 12 reps each leg.
Seated Calf Raise – 2 sets of 25 reps (lighter weight, higher rep burn-out).
Notes: The single-leg raises will be challenging; use assistance if needed to complete reps with good form. The second exercise is a high-rep finisher for the soleus – expect a deep burn.Progression into Week 2: Try to add a little weight or 2-3 reps to each set if you can do so with good form. For example, if you did 15 bodyweight single-leg raises easily, hold a light dumbbell in Week 2. Small increases are fine – the priority is still form and ROM.
Weeks 3–4: Build Phase
Now we increase the stimulus. Volume or intensity goes up.
Frequency: 3 calf workouts per week (e.g., Monday, Wednesday, Friday).
Workout A:
Standing Barbell/Dumbbell Calf Raise – 4 sets of 10-12 reps (heavier weight than Weeks 1-2).
Seated Calf Raise – 3 sets of 15-20 reps (moderate-heavy).
Notes: We’ve added an extra set and bumped the weight on standing raises to start hitting those fast-twitch fibers harder. Really challenge yourself on the weight here (as long as form is maintained). On seated raises, if you got 20 reps last time, increase the weight and aim for at least 15 reps. By now you should be feeling stronger in the full ROM.Workout B: (same week, e.g., Wed)
Leg Press Calf Press – 3 sets of 12-15 reps (moderate weight).
Tibialis Raises – 3 sets of 20 reps.
Notes: The leg press calf press is another straight-leg move, but easier to go high-rep. Focus on a deep stretch under control. After those, blast the tibialis with a few high-rep sets (you can superset these with calf presses to save time, since they work opposite muscles).Workout C:
Donkey Calf Raise (or Standing if no machine) – 3 sets of 15 reps.
Seated Calf Raise – 2 sets of 20-25 (light to moderate, focusing on burn).
Notes: This workout is a bit lighter to give a break from heavy loading – think of it as a “pump” day. On donkey raises, use a weight you can handle for 15 controlled reps (if using bodyweight with a partner and that’s too easy, add a backpack or weight plate). High-rep seated raises again to finish off.Progression into Week 4: Aim to increase reps or weight in each exercise. By week 4, you might try some intensity techniques: for example, on your last set of standing or donkey raises, do a rest-pause (when you hit failure, rest 10 seconds and try a few more reps) or a drop set (reduce the weight and continue). These techniques can further stimulate growth, but use them sparingly (maybe one exercise per week) so you don’t overdo it.
Weeks 5–6: Intensification Phase
Peak of the cycle; pushing volume and intensity high, then taper.
Frequency: 3 calf workouts per week (similar split as Weeks 3-4).
Workout A:
Standing Calf Raise – 5 sets of 8-10 reps (heavy; really challenge your max on these).
Finisher: Bodyweight Standing Calf Raises – 1 set to failure (as many quality reps as possible, likely 20+).
Notes: The standing raises now go to 5 sets – pyramiding up in weight is a good approach (each set a bit heavier, fewer reps). After your heaviest set, drop all weight and rep out bodyweight raises until you can’t lift your heels anymore – this pumps every last fiber.Workout B:
Seated Calf Raise – 4 sets of 15-20 (heavy for that rep range – if you usually use 50 lbs, try 60-70 lbs, etc.).
Superset: Tibialis Band Raises – 4 sets of 15 (superset immediately after each seated set).
Notes: Supersetting the front and back of lower leg here. Your rest comes while stretching one side and working the other. This also saves time. By the end, your shins and calves will be filled with blood (the good kind of burn).Workout C: (End of week)
Mixed Calf Routine: 2 sets single-leg calf raises (each leg, as many reps as possible), then 2 sets both-leg raises to failure. Finish with 2 sets of any calf stretch of your choice, 30+ second hold.
Notes: In week 5, push the reps higher (maybe add a little weight to single-leg raises if possible). In week 6, this workout C can serve as a deload-ish session: do everything with just bodyweight, focusing on deep stretches and quality, to start letting your calves recover a bit.
After Week 6, evaluate your progress. Your calves should feel stronger and possibly a bit bigger (measure or take progress photos!). At this point, it’s wise to reduce calf training volume for a week (i.e. a light “deload” week) to let them fully recover. Then you can start a new cycle, adjusting exercises or intensity as needed (see next section on periodization).
Remember: This sample plan is just one way to structure calf training. Feel free to adjust based on your schedule and recovery. What’s important is the principles: train calves multiple times per week, hit both gastroc and soleus with different exercises, gradually increase the challenge (more weight, more reps, or more sets), and prioritize form and full range of motion throughout. Consistency over these 6 weeks is key – don’t skip calf days! If you stick with it, you’ll likely break through that plateau and start seeing improvements.
Long-Term Strategies: Cycling Your Calf Training (Periodization)
Building impressive calves won’t happen overnight. It requires long-term planning and sometimes changing up your approach over months. This is where periodization – a fancy term for structured training cycles – comes in. Periodization means varying your training (volume, intensity, frequency, etc.) over time to maximize gains and prevent burnout pmc.ncbi.nlm.nih.gov. Here’s how you can apply it to calf training:
Alternate Focused Blocks and Maintenance: If calves are a priority, you might do a dedicated high-volume calf cycle (like the 6-week program above) to spur growth, but you shouldn’t train with high volume indefinitely. After an intense block, scale back to a maintenance routine for a while. For example, follow 6-8 weeks of hard calf training with 4 weeks of lighter training (maybe 1-2 calf sessions/week, lower volume) to allow full recovery and consolidation of gains. During this maintenance phase, you won’t likely gain much more size, but you’ll keep what you built while letting your tendons, joints, and central nervous system recover from the intense work. Then you can launch into another growth cycle. This on-and-off approach can be repeated throughout the year and often yields better results than hammering away non-stop.
Vary Rep Ranges Over Time: Don’t get stuck in one rep range forever. Calves respond to both high and low reps, so plan periods emphasizing each. For 4 weeks, you might focus on heavy 5–8 rep sets (to build strength and tap into fast-twitch fibers). In the next phase, switch to moderate 10–20 rep sets for hypertrophy and some endurance. Then perhaps a phase with ultra-high 20–30 rep burnouts (to really tax slow-twitch fibers and improve capillary density). You can also use an undulating approach, mixing these rep ranges within a given week, as we did in the sample program. The idea is to prevent your calves from adapting fully to one style – keep stimulating new adaptations by cycling rep schemes.
Adjust Frequency Through the Year: If you normally train calves twice a week, try a period of higher frequency training (say, 4 times a week but shorter sessions) for a month to shock them with frequency, then dial back to twice a week again. Conversely, if you’ve been blasting them every day (some people attempt daily calf training), you might actually grow more by pulling back and giving more recovery time. Changing frequency is another lever: for a month, you could do a “calf specialization” where you train them every workout (even just 1-2 sets each time, high frequency), then return to a moderate frequency routine. Experiment and see what your calves seem to respond to best, but remember more isn’t always better long-term – it’s the strategic variation that counts.
Include Deloads and Rest Periods: Every 6-12 weeks, include a deload week (or at least a calf deload). This might mean doing only light stretching and mobility for calves for a week, or very low volume, to let them fully recover. It might feel counterintuitive, but this prevents overtraining and often you’ll come back stronger. Think of it as taking two steps forward, one step back – those rest steps allow for bigger leaps forward in the next cycle.
Prioritize Calves at the Right Time: If calves are really a lagging part for you, consider prioritizing them when you’re not simultaneously crushing some other body part with high volume. The body has a limited recovery ability. For example, you might choose 8 weeks to specialize in calves (higher volume) while keeping your other muscle group training at maintenance. After those 8 weeks, shift focus – maybe maintain calves and specialize in something else. Over a year, each muscle gets its turn to shine. This way, you’re not trying to bring up everything at once (which can lead to stagnation). For calf-specific priority, training them early in a workout (when you’re fresh) a few times can also help – you don’t always have to leave them last when energy is low.
Track Progress and Adjust: Keep a training log for your calf workouts. Note weights, reps, how they felt, any PRs (personal records). Calves can be slow to show visible changes, so strength endurance improvements are a good indicator your training is working. If you notice a plateau (e.g., you’ve been stuck at the same weight/reps for a few weeks and calves look the same), it’s time to change something – maybe start a new phase with a different emphasis as described above. Periodization is all about these planned changes, rather than random guessing.
In summary, periodize your calf training by cycling through different phases: high volume vs. low volume, heavy vs. light, high frequency vs. low frequency. This planned variety keeps your calves responding and minimizes the risk of hitting a wall or getting injured. As research in sports science suggests, planned manipulation of training variables leads to better strength and hypertrophy gains than doing the same routine over and over. Apply that wisdom to your calf workouts, and you’ll avoid frustrating plateaus while continually making progress year-round.
Key Takeaways
Know Your Calf Muscles: The calf is made up of the gastrocnemius (fast-twitch powerhouse) and the soleus (slow-twitch workhorse), plus the front shin muscle (tibialis anterior). Train all of them for balanced development. Gastroc needs heavy loads; soleus thrives on high reps.
Train Smart, Not Just Hard: Use a full range of motion (deep stretch to full contraction) and control your reps – no bouncing. Include both straight-leg and bent-leg calf exercises to hit both muscles. A mix of rep ranges (heavy and high-rep) will yield the best growth stimulus.
Be Consistent and Progressive: Train calves multiple times per week (2-3 times is a good target) and aim to gradually increase the weight or reps over time. Treat calf workouts with the same importance as bigger muscle groups. Progression + patience = growth.
Recover and Stretch: Don’t neglect recovery protocols. Stretch your calves often to keep them flexible and prevent tightness. Foam roll or massage to work out knots. Ensure you’re giving your calves rest days – they can get overtrained like any muscle. Watch for signs of overuse (persistent pain or plateau) and back off if needed.
Think Long-Term: Use training cycles. Blast your calves for a few weeks, then ease up to let them recover. Change up your routine every couple of months (different exercises, rep schemes, intensity) to keep progress coming. Periodically assess and tweak your program rather than doing the same thing endlessly.
Fuel Your Gains: Support your training with proper nutrition – plenty of protein, enough calories to gain muscle, and staying hydrated. A well-fed body will translate those tough workouts into actual muscle growth. If diet is lacking, calves (and other muscles) won’t grow optimally.
Finally, remember that calf size can be influenced by genetics (some folks have longer Achilles tendons and shorter muscle bellies, which can make big bodybuilder calves harder to achieve). But everyone can improve shape, strength, and muscle density with diligent training. Focus on what you can control: your effort, consistency, and knowledge – and you’ve got those covered now. Time to put in the work and watch those calves grow. Happy training!
References
Antonio, J., & Gonyea, W. J. (1993). Role of muscle fiber hypertrophy and hyperplasia in intermittently stretched avian muscle. Journal of Applied Physiology, 74(4), 1893–1898.
Bojsen-Møller, J., Magnusson, S. P., Rasmussen, L. R., Kjaer, M., & Aagaard, P. (2005). Muscle performance during maximal isometric and dynamic contractions is influenced by muscle tendon stiffness. Journal of Applied Physiology, 99(3), 986–994.
Delp, M. D., & Duan, C. (1996). Composition and size of type I, IIA, IID/X, and IIB fibers and citrate synthase activity of rat muscle. Journal of Applied Physiology, 80(1), 261–270.
Fry, A. C. (2004). The role of resistance exercise intensity on muscle fibre adaptations. Sports Medicine, 34(10), 663–679.
MacDougall, J. D., Sale, D. G., Moroz, J. R., Elder, G. C., Sutton, J. R., & Howald, H. (1979). Mitochondrial volume density in human skeletal muscle following heavy resistance training. Experimental Neurology, 64(3), 545–553.
Morton, R. W., Murphy, K. T., McKellar, S. R., Schoenfeld, B. J., Henselmans, M., Helms, E., ... & Phillips, S. M. (2018). A systematic review, meta-analysis and meta-regression of the effect of protein supplementation on resistance training-induced gains in muscle mass and strength in healthy adults. British Journal of Sports Medicine, 52(6), 376–384.
NSCA – National Strength and Conditioning Association. (2016). Essentials of Strength Training and Conditioning(4th ed.). Human Kinetics.
Schoenfeld, B. J. (2010). The mechanisms of muscle hypertrophy and their application to resistance training.Journal of Strength and Conditioning Research, 24(10), 2857–2872.
Schoenfeld, B. J., Ogborn, D., & Krieger, J. W. (2016). Effects of resistance training frequency on measures of muscle hypertrophy: A systematic review and meta-analysis. Sports Medicine, 46(11), 1689–1697.
Wakahara, T., Fukutani, A., Kawakami, Y., & Yanai, T. (2013). Nonuniform muscle hypertrophy: Its relation to muscle activation in training session. Medicine & Science in Sports & Exercise, 45(11), 2158–2165.
Zuniga, J. M., Housh, T. J., Camic, C. L., Hendrix, R. C., Mielke, M., Johnson, G. O., & Schmidt, R. J. (2012). The effects of creatine monohydrate loading on anaerobic performance and one-repetition maximum strength. Journal of Strength and Conditioning Research, 26(6), 1651–1656.