Indulgent Protein Delight
Looking for a dessert that’s both indulgent and nourishing? This no-bake Fresh Fruit protein cheesecake is the perfect fusion of flavor and function. Made with a naturally sweet date, nut, and seed crust and packed with protein from Greek yogurt, cottage cheese, and protein powder, it’s a treat that supports your goals—whether that’s post-workout recovery, clean eating, or just a better-for-you sweet tooth fix.
Naturally sweetened, gluten-free, and no baking required—just blend, chill, and enjoy a slice of pure bliss
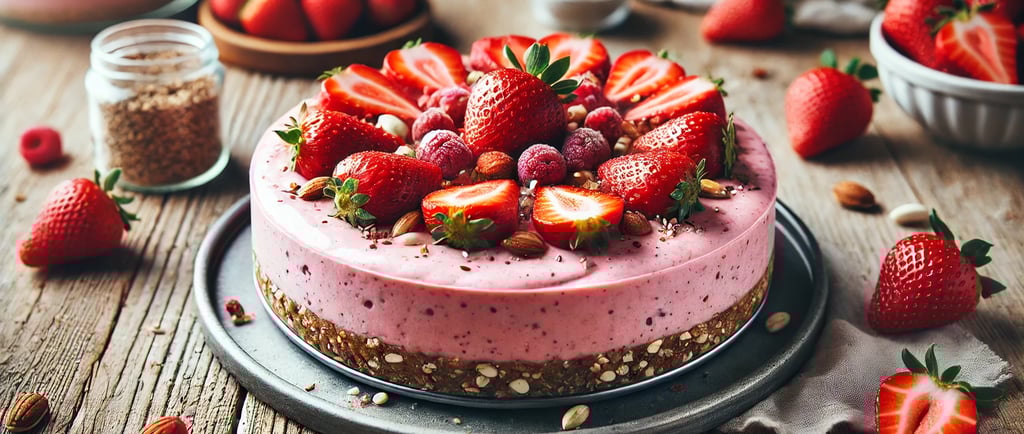
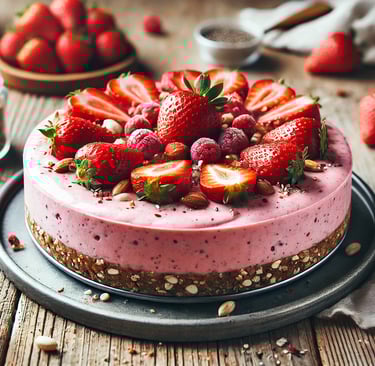
No-Bake Protein Cheesecake
with Fresh Fruit
A Healthier Take on a Sweet Childhood Memory
Every time we visited my grandma, there was one thing we could always count on: her homemade cheesecake. It was rich, creamy, and piled high with whipped cream on a buttery cookie crust—a true labor of love and the heart of so many sweet memories.
This recipe is my way of honoring those moments, but with a nourishing twist. It’s still creamy and satisfying, but made with wholesome ingredients, no baking required, and a lot friendlier on your waistline. Think of it as comfort food reimagined—because some traditions are worth keeping, just with a modern touch. 💛
My favorite fruit for this cheesecake is probably strawberries. Although now that I think about it… raspberries are also pretty amazing. But please don’t let me hold you back—go for your own favorite fruit and make it your own!
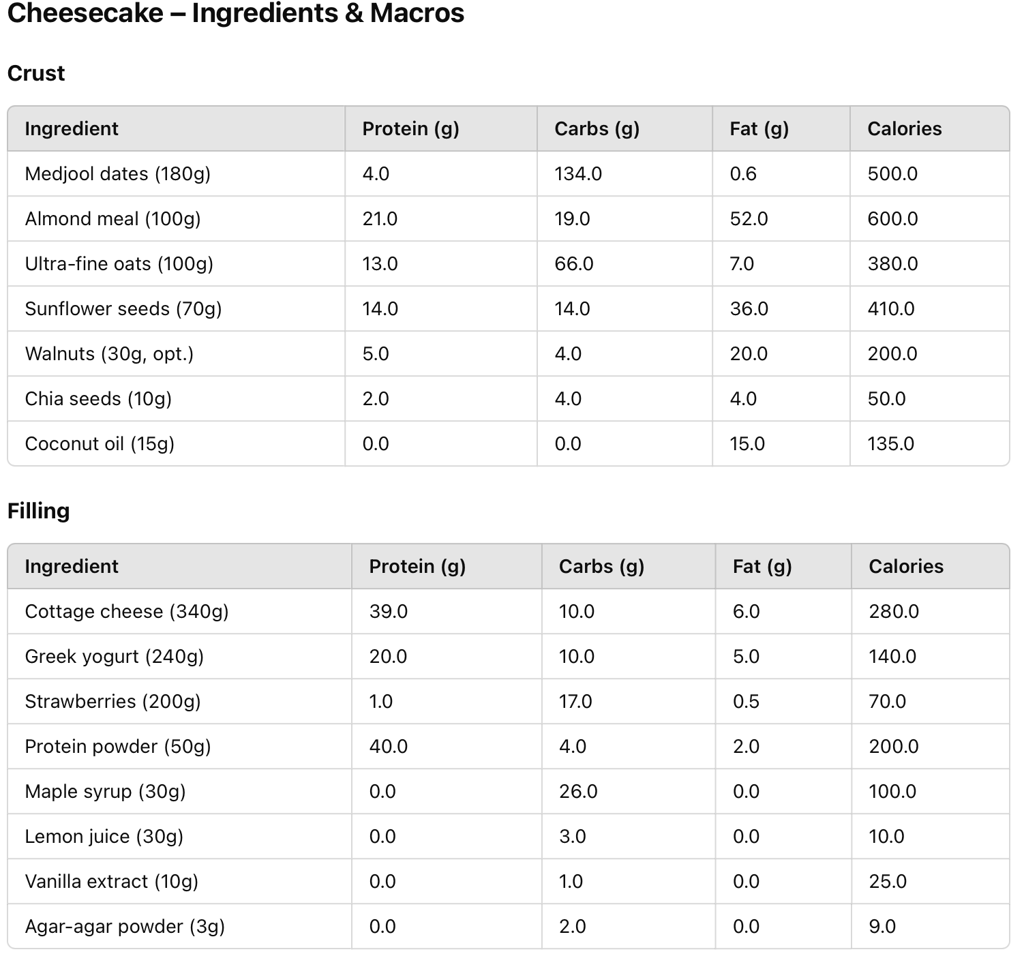
Ingredients (For Crust & Filling)
Crust
Medjool dates (pitted) – 1 cup (180g)
Almond meal– 1 cup (100g)
Ultra Fine Oats - 1 cup (100g)
Sunflower seeds or pumpkin seeds – ½ cup (70g)
Walnuts or pecans (optional) – ¼ cup (30g)
Chia seeds or flaxseed meal – 1 tbsp (10g)
Coconut oil – 1 tbsp (15g)
Salt – Pinch
Filling
Cottage cheese (low-fat) or light cream cheese – 1½ cups (340g)
Greek yogurt (plain, 2% or fat-free) – 1 cup (240g)
Strawberries (or any of Your favorite fresh fruit) – 1 to 1½ cups (150–225g)
Vanilla or unflavored protein powder – 2 scoops (50g)
Maple syrup, honey, or other sweetener – 2–4 tbsp (30–60g) or to taste
Vanilla extract – 2 tsp (10ml)
Lemon juice – 2 tbsp (30ml)
Gelatin powder – 1 tbsp (8g) - or replace the gelatin with Agar-Agar powder - 1 tsp (3g)
Hot water (to bloom gelatin) – 2–3 tbsp (30–45ml)
How to Make No-Bake Protein Cheesecake (Step-by-Step)
1. Make the Crust:
In a food processor, blend the dates until they begin to form a paste.
Add almond meal, oats, seeds, nuts, coconut oil, chia/flax, and salt.
Pulse until everything sticks together. If it feels dry, add a teaspoon of water at a time.
Press the crust evenly into the base of a lined springform pan or dish.
Freeze while making the filling.
2. Prepare the Filling:
If using gelatin, bloom it in hot water for 5 minutes and stir to dissolve.
In a blender, combine cottage cheese, yogurt, strawberries (or any of your favorite fresh fruit), protein powder, sweetener, vanilla, and lemon juice.
Add gelatin mixture (if using).
Blend until completely smooth and creamy.
3. Assemble & Chill:
Pour the fruit mixture over the crust.
Smooth the top and refrigerate for 4–6 hours (or overnight) until set.
4. Serve & Enjoy:
Top with sliced fresh fruit, extra seeds, or a drizzle of nut butter for that wow factor
Tips for the Best Texture and Flavor
Want that ultra-smooth, creamy cheesecake texture? These tips will help you get it right every time:
Use room temperature ingredients. This helps everything blend smoothly without lumps.
Don’t skip the chilling time. Let it set in the fridge for at least 4–6 hours, or overnight for best results.
Balance the sweetness. Taste the filling before setting—adjust with a bit of honey, maple syrup, or a few drops of stevia if needed.
Choose a protein powder with great flavor and texture. Vanilla or unflavored protein works best; avoid anything chalky.
For agar-agar users: Make sure you dissolve it properly (more on that below) or your filling may not set right.
Optional: Garnish right before serving to keep fruit fresh and vibrant!
Variations to Try
This no-bake protein cheesecake is incredibly versatile. Try these easy variations to make it your own:
Chocolate Swirl: Add a spoonful of melted dark chocolate to the filling and gently swirl before chilling.
Berry Blast: Mix fresh or frozen berries directly into the filling for a fruity pop in every bite.
Tropical Vibes: Use coconut yogurt or add pineapple and mango on top for a sunny, summery twist.
Vegan Version: Use dairy-free yogurt, plant-based protein, and swap the crust for nuts and dates.
Low-Carb Option: Make a nut-based crust with almond flour and use a low-carb sweetener in the filling.
Mini Cheesecakes: Pour the filling into silicone muffin molds for single-serve treats—perfect for meal prep.
Feel free to experiment—the base recipe is flexible, and the flavor combos are endless.
Quick Notes for Using Agar-Agar
What is Agar-Agar?
Agar-agar is a natural, plant-based gelling agent derived from red seaweed. Often used as a vegetarian alternative to gelatin, it creates a firm, jelly-like texture without the need for animal products. It's flavorless, odorless, and sets at room temperature—making it perfect for no-bake desserts like cheesecakes, panna cotta, and fruit gels. Just a small amount goes a long way, and it must be heated briefly to activate its gelling properties.
Quick Notes on Using Agar-Agar:
Gelatin and agar-agar don't work the same way—agar sets much firmer and faster, and doesn’t melt at room temperature.
Agar must be boiled briefly to activate. Here's how:
How to Use Agar in Your Cheesecake:
Activate it with heat. Agar only works if it's dissolved in boiling liquid. Let it simmer for at least 2–3 minutes until fully dissolved—just stirring it in won't work.
Activate it with heat. Agar only works if it's dissolved in boiling liquid. Let it simmer for at least 2–3 minutes until fully dissolved—just stirring it in won't work.
Work quickly. Agar starts setting as it cools, so once it’s dissolved and slightly cooled, mix it into your filling right away.
Use the right amount. A little goes a long way. Typically, 1 teaspoon of agar powder is enough to set 1 cup of liquid firmly.
Avoid graininess. If your agar doesn’t fully dissolve, the texture can turn gritty. Make sure your liquid is at a rolling boil and stir constantly.
No re-melting. Unlike gelatin, agar can’t be reheated and re-set. Prepare only when you’re ready to assemble the cheesecake.
✅ Tip: If you're using flavored liquids like fruit juice or milk to dissolve agar, keep the total liquid-to-agar ratio accurate for a good set.
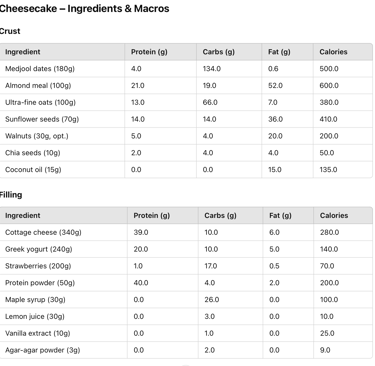
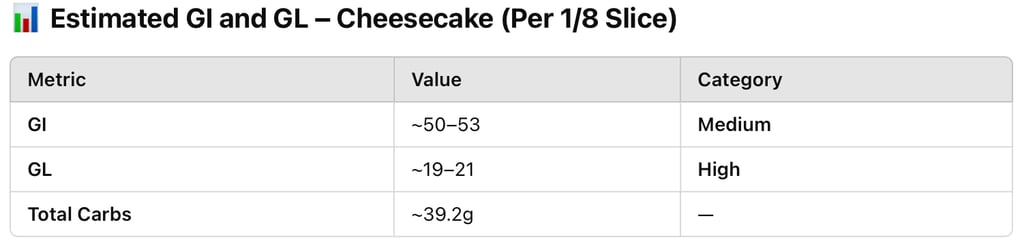
Ingredients & Macronutrients