7 Underrated Gym Exercises
That Deliver Big Results
Why Underrated Exercises Deserve More Attention
If your workout routine feels stagnant or you’re not seeing the gains you expect, it might be time to look beyond the usual suspects like bench presses and biceps curls. Incorporating underrated exercises can be a game-changer for breaking plateaus and developing well-rounded strength. These hidden gems often target neglected muscles, improve functional fitness, and enhance overall performance. Below, we highlight seven highly effective gym exercises that don’t always get the spotlight they deserve. Each exercise includes what it works, why it’s overlooked, key benefits, how to do it with proper form, common mistakes, and suggested rep ranges for beginner, intermediate, and advanced gym-goers. Let’s dive in and upgrade your training toolbox!
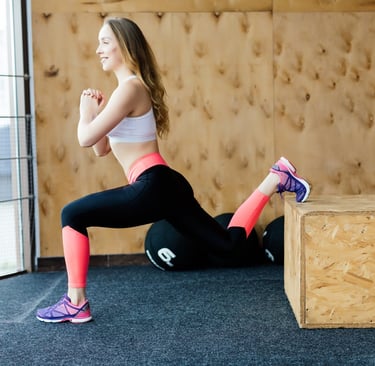
1. Bulgarian Split Squat
The Bulgarian split squat is a challenging single-leg squat variation performed with your rear foot elevated on a bench or step. This unilateral exercise intensely works the quadriceps, glutes, and hamstrings of the front leg, while engaging your core for balance and stability. Many lifters have a “love-hate” relationship with Bulgarian split squats – theyburna lot, but deliver huge payoffs. In fact, just three sets of ten can leave your legs quivering, even with just bodyweight. Despite the discomfort, they’re absolutely worth doing for the strength and muscle gains they produce.
Primary Muscles Worked: Quadriceps (front of thighs), glutes (buttocks), hamstrings (back of thighs). Core and calves assist for stability.
Why It’s Underrated: Because it’s tough! This exercise is often skipped in favor of easier bilateral moves like regular squats. Many gym-goers avoid Bulgarian split squats due to the balance challenge and intense muscle burn. As a result, it’s sometimes left out of traditional programs that focus on two-legged exercises, even though unilateral training addresses muscle imbalances and improves coordination.
Key Benefits:
Builds lower-body strength and size (especially quads and glutes)
comparable to barbell squats.Improves balance, core stability, and coordination by training
one leg at a time.Helps identify and correct left-right strength imbalances, leading to more
symmetrical development.Can increase overall squat and deadlift performance by strengthening
supporting muscles.
How to Perform:
Stand lunge-length in front of a bench. Extend one leg back and rest the top of your foot on the bench (laces down).
Keep your front foot flat and planted a comfortable distance forward so that you can squat down without your knee shooting past your toes. Hold your chest up tall. You can perform this with just bodyweight or hold dumbbells at your sides for added resistance.
Lower straight down by bending your front knee and hip. Aim to get your front thigh about parallel to the floor. Your rear knee will naturally drop toward the floor (you may feel a deep stretch in that thigh).
Drive through the heel of your front foot to rise back up to the starting position, extending your front knee and hip. Maintain your balance and avoid pushing off the back leg — the front leg should do most of the work.
Complete all reps on one leg, then switch to the other. Keep your core engaged and torso upright throughout to avoid leaning too far forward.
Common Mistakes:
Too Short or Too Long a Stance: If your front foot is placed too close to the bench, your knee may travel excessively past your toes; too far out, and you may feel an uncomfortable stretch in the rear leg hip flexor. Adjust distance so you can descend with front shin roughly vertical at bottom.
Losing Balance: Wobbling or falling to the side is common. Focus on a spot in front of you, engage your core, and move slowly. Hold onto a support or use lighter weight until you build stability.
Front Knee Collapsing Inward: Maintain knee tracking in line with your toes. Letting the knee cave in can strain your joint – push it slightly outward and engage your glutes.
Driving with the Back Leg: The rear leg is there for support. Avoid bouncing or pushing off the back foot; instead, press through the heel of the front foot to lift yourself up.
Suggested Rep Ranges:
Beginner: 8–10 reps each leg for 2–3 sets (start with just bodyweight to nail down form).
Intermediate: 8–12 reps each leg for 3–4 sets (hold dumbbells once balanced; add weight gradually).
Advanced: 10–15 reps each leg for 3–4 sets (use heavy dumbbells or a barbell across your back for increased load). Focus on controlled tempo or even add a pause at the bottom for extra challenge.
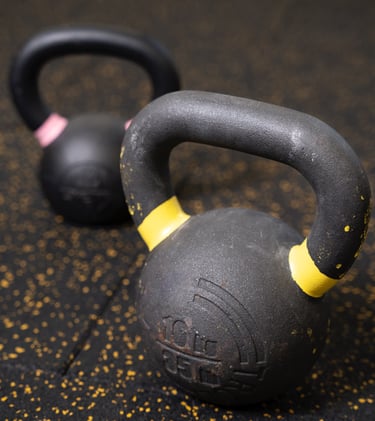
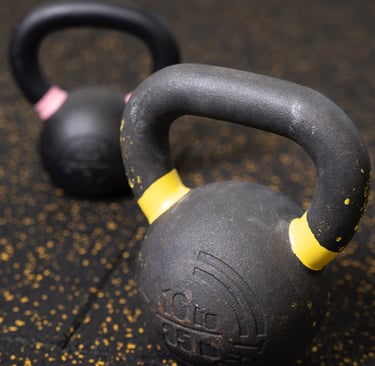
2. Farmer’s Walk (Weighted Carry)
The farmer’s walk (farmer’s carry) is as simple as it is effective: pick up heavy weights in each hand and walk forward. This full-body exercise, a staple of strongman training, is often overlooked in typical gym routines that favor static lifts. Walking with weight engages your grip,shoulders,back,core, and even your legs in one go. “Picking up something heavy and carrying it will improve your grip, shoulder health and upper body posture… and it has a huge metabolic effect, so it’ll burn fat too,” strength coach Olli Foxley notes. In other words, farmer’s walks can build muscleanddouble as cardio conditioning – a two-for-one benefit that few exercises offer.
Primary Muscles Worked: Forearms and hand grip muscles; trapezius and shoulders
(from holding weight and staying upright); upper back; core (abs and lower back)
for stabilization; glutes, quads, hamstrings, and calves to support walking under load.
Practically every major muscle gets involved to some degree.
Why It’s Underrated: Loaded carries like the farmer’s walk rarely appear in bodybuilding
or general fitness programs. They’re more common in athletic training or strongman
events. Many people underestimate carries because they look
“too basic” – essentially just walking – or they default to exercises that target muscles
in isolation. As a result, this functional move is often skipped, even though it delivers broad
benefits that conventional lifts don’t.
Key Benefits:
Grip Strength: Few exercises rival farmer’s walks for building a vice-like grip and forearm strength, which carry over to better deadlifts, pull-ups, and daily tasks.
Trap and Upper Back Development: Holding heavy weights at your sides forces your trapezius and upper back to work hard to keep your shoulders back, contributing to a broader, more stable upper body.
Core and Posture: Walking under load teaches you to brace your abs and stand tall. This improves core stability and encourages an upright posture (combating the slouch from sitting all day).
Leg Drive and Endurance: Your legs, hips, and even ankles get a workout supporting and moving the weight. Over multiple sets or longer distances, farmer’s walks become a serious cardio and muscular endurance challenge, burning calories and training your heart.
Functional Strength: This exercise mimics real-life activities (carrying groceries, moving furniture). It builds real-world strength and resilience, making everyday tasks easier and reducing injury risk outside the gym.
How to Perform:
Choose a pair of heavy dumbbells or kettlebells (or trap bar if available). Start with a weight that’s challenging but allows you to maintain good form for at least 20–30 seconds of walking.
Stand between the weights, squat down with a straight back, and grasp them securely in each hand. Engage your core and pack your shoulders down and back (think “stand tall and proud” – no slouching).
Lift the weights by driving through your legs, extending your hips and knees until standing upright. You should now be holding the weights at your sides with arms straight, chest up, and shoulders back.
Begin walking forward in a straight line. Take short, quick steps or a normal gait – whatever feels stable. Keep your core tight and gaze forward. Avoid leaning or swaying side to side; stay as upright as possible.
Walk for a set distance (e.g. 20–40 meters) or time (e.g. 30 seconds). Aim to maintain a steady pace. If you feel your grip about to fail or your posture collapsing, carefully set the weights down.
Rest as needed, then repeat for the desired number of sets.
Common Mistakes:
Slouching or Rounded Shoulders: As you fatigue, you might hunch forward or let your shoulders roll. Fight this by keeping shoulder blades pulled together and down. Good posture ensures the right muscles are working and protects your lower back.
Using Too Much Weight Too Soon: Going excessively heavy can lead to poor form (dropping shoulders, leaning back, or uncontrolled steps). Start slightly lighter to nail proper form and distance, then increase weight gradually.
Short, Choppy Breaths or Holding Breath: Remember to breathe steadily. It’s easy to hold your breath under strain, but try to inhale and exhale continuously to fuel your muscles and maintain stability.
Turning it into a Run: This is a controlled walk, not a sprint. Don’t rush; fast, careless steps can lead to a loss of balance or zig-zag path. Focus on deliberate, strong steps.
Dropping Weight with Bad Form: When finishing, don’t just drop the weights if your gym doesn’t allow it. Lower them by bending your knees and hips, keeping your back flat, to safely return them to the ground.
Suggested Rep Ranges:
Beginner: Carry a moderate weight for about 20–30 seconds or ~20 meters. Do 2–3 sets. Focus on posture and steady strides.
Intermediate: Carry heavier weights for 30–60 seconds or 30–50 meters. Do 3–4 sets. You can increase distance or weight as this gets easier, or try one-arm carries to challenge your core.
Advanced: Use heavy weights (e.g., bodyweight in each hand, if capable) for 60+ seconds or 50+ meters. Do 3–5 sets. You can also incorporate variations: single-arm farmer’s walks, farmer’s walks on an incline, or longer “suitcase carry” challenges. Go heavy, but only as long as you can maintain form.
(Since farmer’s walks are measured by distance or time rather than repetitions, use these guidelines)
3. Face Pull
The face pull is a cable exercise that targets the often-neglected rear shoulders and upper back muscles. Using a rope attachment at head height, you pull the weight toward your face, externally rotating your shoulders as if doing a “double biceps” pose at the end. Face pulls primarily strengthen the posterior deltoids (rear delts), mid-trapezius, lower trapezius, and rotator cuff muscles – all crucial for shoulder health and posture. Because most traditional workouts emphasize pressing (chest, front delts) over pulling, the rear delts and mid-back tend to be weaker and undertrained, which can lead to imbalances and injuries. Face pulls directly address this imbalance, making them a must-add for a stronger, more stable upper body.
Primary Muscles Worked: Posterior deltoids (back of shoulders), rhomboids (between shoulder blades), mid and lower trapezius (mid/upper back), and the rotator cuff (external shoulder rotators, e.g., infraspinatus and teres minor). The movement also involves biceps and forearms secondarily as you pull, and core to stabilize your body.
Why It’s Underrated: The rear delts and rotator cuff muscles are small and often overlooked in favor of mirror muscles like the chest and front shoulders. Face pulls don’t have the “ego lift” appeal of exercises like the bench press, so lifters (especially beginners) may skip them, not realizing how important they are for balanced development. In traditional push-pull routines, rear delt work is sometimes an afterthought. The face pull is sometimes performed incorrectly or with too much weight (turning it into a more general back exercise), which leads people to dismiss it. However, when done properly, it’s one of the best moves to undo the damage of too much pressing and sitting. Think of face pulls as a posture-correcting exercise – they’re highly effective but far less popular than they should be.
Key Benefits:
Improved Posture: Face pulls strengthen the muscles that retract your shoulder blades and pull your shoulders back. Over time, this helps counteract “slumped” or rounded-forward shoulders from desk work, leading to a taller, more upright posture.
Shoulder Health & Injury Prevention: By targeting the rotator cuff and rear delts, face pulls build shoulder stability. This can reduce the risk of shoulder impingements, rotator cuff injuries, and balance out heavy chest/front delt training. It’s essentially a “prehab” exercise for the shoulders.
Upper Back Strength and Thickness: Regular face pulls contribute to a stronger upper back (traps, rhomboids). A strong upper back not only looks great (helping create that V-shape), but also supports heavier lifts like bench presses and deadlifts by providing a solid foundation.
Balanced Physique: Bringing up your rear delts and upper back will round out your physique. It can make your shoulders look more 3D and improve your strength on rowing and pulling movements.
Versatility and Accessibility: Face pulls can be done with a cable machine or resistance bands, making them easy to include in almost any gym or home workout. They’re low-impact and suitable for all levels as long as you use correct form.
How to Perform: (Cable Machine with Rope Attachment)
Setup: Attach a rope handle to a cable pulley set at roughly upper-chest or neck height. Stand facing the machine. Grasp the ends of the rope with an overhand grip (palms facing down) or neutral grip (palms facing each other) – choose what feels comfortable for your shoulders. Step back so there’s tension in the cable and extend your arms in front of you. Stance can be shoulder-width or staggered; bend your knees slightly and brace your core.
Initiate the Pull: Begin by squeezing your shoulder blades together before you bend your arms. Then lead with your elbows as you pull the rope toward your face. Your elbows should drive outward (at about 90° to your body) and high, as if you’re trying to point them behind you. Keep your upper arms roughly parallel to the floor.
External Rotation: As you pull, imagine splitting the rope in two. Bring your hands toward either side of your face (around eye level), not directly to your mouth or nose. At the end of the movement, your hands will be near your ears and your forearms perpendicular to the floor (forming a “goalpost” position with your arms). You should feel a strong contraction in the back of your shoulders and between your shoulder blades.
Peak Contraction: Hold the end position for a brief second, squeezing your rear delts and traps hard. Ensure your chest stays up and you haven’t leaned backward excessively – the movement is from the arms and shoulders, not the lower back.
Return: Slowly extend your arms back to the starting position, controlling the weight as your shoulders move forward. Keep a bit of tension – don’t let the weights crash down or your shoulders hunch completely. Maintain a proud chest. That’s one rep.
Form Tips: Keep your neck neutral (don’t jut your head forward). Avoid shrugging; keep shoulders down as you pull. The movement should be a combination of a row and an external rotation of the shoulder.
Common Mistakes:
Using Too Much Weight: If you pile on weight, you’ll tend to compensate by using your body momentum (leaning back and heaving) or recruiting the wrong muscles (like lats or lower back). Use a weight that lets you perform the exercise with strict form – rear delts are small muscles, so they don’t need a huge load.
Pulling with Biceps: This is not a bicep curl or a standard row – avoid simply pulling with your arms. Focus on the shoulder movement: retract the scapulae and externally rotate. Imagine your hands are hooks and initiate the pull with your back and shoulder muscles, not your biceps.
Elbow Positioning: Dropping the elbows too low turns the move into more of a lat pulldown/row hybrid; flaring them too high (above shoulder level) can impinge the shoulder. Aim for a happy medium – elbows at shoulder height or just slightly below.
Half Reps: Ensure you go through the full range of motion – from arms extended (protracted shoulders) to a full squeeze with shoulder blades retracted. Don’t stop short of bringing the rope toward the face, and equally, don’t cut the eccentric (return) phase short. A full stretch and contraction yields the best results.
Lack of Control: Letting the weights slam back or rushing through reps negates the benefits. Perform each rep deliberately with a controlled tempo – about 1-2 seconds pulling and 2-3 seconds releasing.
Suggested Rep Ranges:
Beginner: 2–3 sets of 10–15 reps with a light weight or resistance band. Focus on feeling the rear shoulder muscles work and mastering the form. Quality over quantity – it’s better to do 10 perfect reps than 15 sloppy ones.
Intermediate: 3 sets of 12–15 reps with moderate weight. By now you should feel a strong burn in the target muscles at the end of each set. You might incorporate face pulls twice per week (e.g., on upper-body days).
Advanced: 3–4 sets of 15–20 reps or 4–5 sets of 10–12 reps with a challenging weight. Advanced lifters can play with intensity techniques: pause for 2 seconds at the peak contraction, or perform slow negatives to increase time under tension. Face pulls are safe to do with relatively high reps – the goal is muscle endurance and quality contraction. Even at advanced levels, prioritize perfect form to reap the postural benefits.
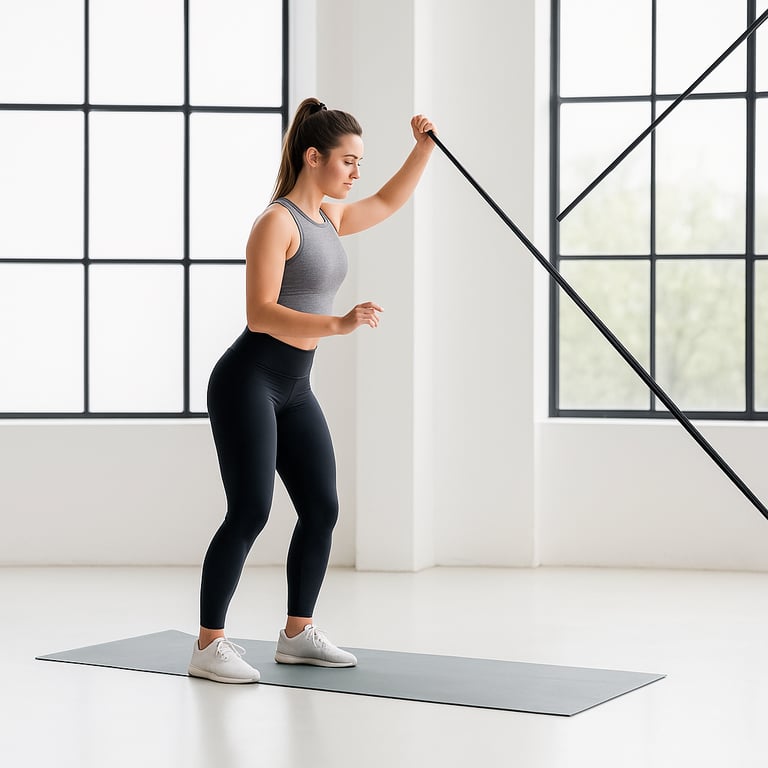
4. Pallof Press
The Pallof press doesn’t look like much at first glance – you stand holding a resistance band or cable at your chest and press it forward – but it is deceptively challenging. This exercise is an anti-rotation core drill: it forces your abs and obliques to resist twisting. As you press the band/cable out in front of you, your core has to brace hard to keep your torso from being pulled toward the anchor point. The Pallof press is one of the most underrated moves for teaching proper core bracing and strength. Forget endless crunches – this exercise trains your core to do what it’s meant for in athletics and daily life: stabilize your spine. It’s beloved by physical therapists and strength coaches for building a rock-solid midsection and protecting the lower back.
Primary Muscles Worked: Transverse abdominis (deep core stabilizer) and obliques (side abs) are the primary targets, as they prevent rotation. The rectus abdominis (six-pack muscle) co-contracts to stabilize, and you’ll also engage glutes, lower back, and even shoulder muscles to hold the position. Essentially, the Pallof press works the entire core and even the hips in an isometric (static) manner.
Why It’s Underrated: Core training in many routines focuses on movement (like crunching, twisting, leg raises). Anti-rotation exercises like Pallof presses are often overlooked because they don’t involve flashy motion or heavy weights – you’re “just standing there” to an observer. Many gym-goers simply haven’t heard of it. Additionally, it’s more about functional strength than aesthetics, so people chasing visible abs might ignore it. However, training your core to resist movement is crucial for real-world strength and injury prevention. The Pallof press remains underutilized despite its effectiveness, making it a secret weapon for those in the know.
Key Benefits:
Core Stability & Strength: This exercise trains your abs and obliques to brace against forces, similar to how they must stabilize during heavy lifts (squats, deadlifts) or sports movements. It’s highly effective for building a stable, strong core that can protect your spine under load.
Spinal Protection: By strengthening the deep core muscles (transverse abdominis) and obliques, Pallof presses help prevent lower back injuries. A strong core reduces strain on the lumbar spine during other exercises and daily activities like lifting objects.
Improved Functional Performance: Anti-rotation strength is useful in athletics (think of a baseball swing or throwing a punch – your core resists excess rotation for efficiency) and in life (carrying uneven loads). This exercise trains your body to transmit force through a stable core, translating to better performance in compound lifts and sports.
Balances the Core Routine: Most ab workouts involve flexion (crunches) or rotation (Russian twists). The Pallof press introduces a different stimulus (resisting rotation), leading to a more well-rounded core program. It can even alleviate back pain caused by weak stabilizers.
Beginner-Friendly (but Scalable): It’s relatively easy to learn – you can start with a light band and simple stance – which makes it great for beginners to build core engagement. At the same time, advanced lifters can make it brutally hard by increasing resistance, performing variations (like kneeling, standing on one leg, or adding movement), or holding the extended position for time.
How to Perform: (Resistance Band version; cable machine is similar)
Set-Up: Attach a resistance band to a sturdy anchor at roughly chest height. (If using a cable machine, set the pulley to chest height and clip on a D-handle.) Stand perpendicular to the anchor point – your side should face the anchor. Grab the free end of the band with both hands and hold it against the middle of your chest. Step away from the anchor until the band has tension. Stand with feet about shoulder-width apart (or try a staggered stance for more balance), knees slightly bent, and weight distributed evenly. Brace your core and glutes.
Press Out: Without rotating your torso (keep shoulders and hips square forward), slowly press your hands straight out in front of you, extending your arms. The band will aggressively try to twist your body toward the anchor – resist this by tightening your abs and obliques. Your arms should end up fully extended at chest level, directly in front of your sternum.
Hold Briefly: At full extension, pause for a moment. You should feel your core working hard to prevent any movement. Don’t let the band pull your hands toward the anchor; keep them centered in front of your chest. Breathe steadily (exhale as you press out, inhale as you hold).
Return: Bring your hands slowly back to your chest, controlled, not letting the band yank you. This is one rep. Ensure your torso didn’t twist throughout the rep – only your arms moved.
Repeat: Perform the desired reps, then turn around and work the opposite side (i.e., if your left side was facing the anchor, switch so your right side faces it). Working both sides prevents developing an imbalance in anti-rotational strength.
Form Tips: Keep a slight bend in your knees and your pelvis tucked (avoid arching your lower back). Imagine a straight line from head to tailbone – maintain that alignment. You can interlace your fingers around the band handle or hold it like a prayer position; just make sure both hands move as one unit. Start with a light band/cable weight – if you’re rotating significantly or can’t control the movement, reduce the tension.
Common Mistakes:
Twisting or Leaning: The whole point is not to rotate. If you find your body turning or leaning toward the anchor as you press, the resistance may be too high or your stance might be too narrow. Widen your base or use less tension so you can keep your torso straight.
Arching the Back: Some people arch their lower back and stick out their ribs as they press, which indicates they’re not properly bracing. Keep your ribcage down and core engaged – think of pulling your belly button toward your spine. Avoid flaring your ribs (no “rib flare”), which can take tension off the abs and strain the back.
Shallow Press (T-Rex arms): Not fully extending the arms reduces the challenge. Make sure you press out to where your elbows are nearly locked (soft elbows). A half-press keeps the weight close to your body and won’t work your core as effectively.
Shoulders Hunching: Maintain good posture – shoulders down and back. Don’t let them shrug up toward your ears or round forward. The movement is coming from your chest outward, not from your shoulders hiking up.
Going Too Fast: This exercise benefits from a slow, controlled tempo. If you punch the band out and let it snap back quickly, you miss the isometric work. Embrace the tension – press out slowly (~1-2 seconds out), hold (1-2 seconds), and return slowly (another 1-2 seconds). If you rush, you’re likely using momentum and not fully engaging the core.
Suggested Rep Ranges:
Beginner: 2–3 sets of 8–10 reps each side. Use a light resistance band. Focus on a solid hold for 1-2 seconds at full extension. You can also begin in a half-kneeling position (inside knee down) to increase stability as you learn the movement.
Intermediate: 3 sets of 10–12 reps each side, or 3–4 sets of 10-second holds each side (to build static endurance). Increase band tension or cable weight moderately. Try more challenging stances: tall-kneeling (both knees down) or standing with feet closer together to engage the core more.
Advanced: 3–4 sets of 12–15 reps each side with heavy resistance or 3–4 sets of 15–20 second holds. Advanced variations include performing the press in a split stance (one foot forward, one back), on a BOSU or balance board, or adding a slow rotation after the press (press out, then gently rotate trunk a few inches each way). You can also incorporate the Pallof press into dynamic moves, like pressing out and then stepping sideways (Pallof press walkouts) for added difficulty. As you advance, the focus remains on zero trunk movement under increasing challenge.
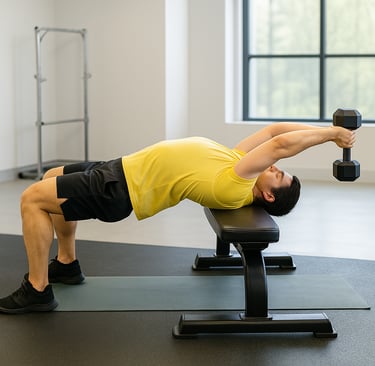
5. Dumbbell Pullover
The dumbbell pullover is an old-school exercise that was a favorite of legendary bodybuilders back in the day – yet it’s rarely seen in modern gyms. Performed lying across a bench holding a dumbbell overhead, the pullover uniquely works both the upper body and the core. Depending on your form, it can emphasize the chest or the latissimus dorsi (back muscles), while also engaging the serratus anterior and intercostals (muscles around your ribs). In essence, it’s a hybrid push/pull move. Pullovers are considered “one of the most underrated exercises” by strength coaches because, when done properly, they tax nearly every muscle in the upper body and even the core. This single move can deliver a stretch and stimulus unlike any other exercise, contributing to upper-body size, shoulder mobility, and spinal stability.
Primary Muscles Worked: Pectoralis major (chest) and latissimus dorsi (broad back muscle) are the primary movers. It also significantly involves the serratus anterior (along the ribs under your armpits), the intercostal muscles (between your ribs), the triceps (especially the long head), the anterior deltoids (front shoulders) to some degree, and the core (abs and lower back) which must stabilize during the movement. Essentially, from your pecs through your lats and down to your abs, the pullover hits a wide swath of muscles.
Why It’s Underrated: The pullover is sometimes considered neither a pure chest exercise nor a pure back exercise, so it falls in a gray area and gets left out. It has also garnered a reputation for potentially bothering the shoulders if done incorrectly, causing some lifters to shy away. In the era of machines and isolation moves, a classic like the pullover seems “old-fashioned.” Many modern routines focus on bench presses for chest and lat pulldowns for back, leaving no obvious slot for pullovers. However, by skipping this exercise, people miss out on its unique benefits – particularly the huge stretch and dual chest-back engagement it offers.
Key Benefits:
Chest & Lat Development: Depending on technique (arm position, bench orientation), the pullover can target the chest or lats heavily – or even both. It’s sometimes called the “upper body squat” because it can expand the ribcage and work so many upper muscles. It provides a deep stretch to the pecs and lats that can spur muscle growth and improve flexibility.
Improved Shoulder Mobility: When performed with proper form, pullovers take your shoulders through a large range of motion. Over time, this can improve overhead flexibility and shoulder mobility, counteracting tightness from heavy pressing. It’s a dynamic stretch for the shoulders and chest.
Core and Serratus Strength: As Dr. Joel Seedman points out, pullovers are incredibly effective for the entire core because you’re resisting extension at the spine throughout the movement. To keep your ribcage from flaring and your lower back from arching, your abs have to work hard isometrically. Also, the serratus anterior (important for shoulder health and that “boxed” look on the ribcage) gets activated to stabilize your scapulae.
Upper Body Integration: The pullover uniquely bridges the gap between a pull (lat exercise) and a push (chest exercise). This can help improve the synergy of your upper-body muscles. For athletes, it mimics movements like throwing or swimming strokes that involve coordinated chest, back, and core action.
Variety and Fun: Quite simply, it’s a novel movement if you’ve never done it. The sensation of moving a weight in an arc over your head and the intense stretch can be a fresh stimulus. It can break the monotony of standard presses and rows, potentially kickstarting new muscle gains by challenging your muscles in a different way.

How to Perform:
Setup Position: Lie perpendicular on a flat bench (classic style) so only your upper back is supported and your body is across the bench, feet flat on the floor for stability – or lie along the length of a bench (head near one end) if you prefer more support for your spine. If lying perpendicular (cross-bench), your neck and head will hang just off the bench edge. Grip a single dumbbell with both hands: make a diamond shape with your hands and cup the inner side of one of the dumbbell’s ends (palms on the underside of the top plate). Press the dumbbell up over your chest with arms almost straight (a slight elbow bend). This is the starting position.
Engage Core and Lats: Before moving, take a deep breath and tighten your core – think of pulling your ribcage down. Keep a slight bend in your elbows and imagine “locking” that arm angle (don’t bend or straighten your arms significantly during the rep).
Lowering Phase (Stretch): Slowly lower the dumbbell in an arc behind your head. Let your arms drift back and down toward the floor. Go only as far as you feel a strong stretch but no pain. Ideally, you reach a point where your biceps are near your ears, or the dumbbell is slightly below bench level (if lying cross-bench, you might go a bit further for extra stretch). Keep those elbows slightly bent and fixed – the motion comes from your shoulders. Your chest and lats will stretch intensely; your instinct will be to flare your ribs – fight that by keeping your core engaged.
Raising Phase (Contract): Squeeze through your chest and lats to reverse the motion and pull the dumbbell back up over your chest. Exhale as you lift. The path is like a semicircle – from behind your head back to above your torso. Do not simply lift with your arms; focus on using your pecs to “pull” when the weight is low (if emphasizing chest) or your lats to sweep it up (if emphasizing back). In reality, both will engage.
Top Position: Bring the dumbbell to about chest level (arms vertical). Avoid bringing it too far forward over your abdomen, which would release tension. At the top, you can feel your chest muscles engaged. Without pausing too long, go into the next rep, inhaling as you once again lower behind the head.
Breathing: A traditional approach is to take a big breath before the lowering phase (to expand the chest), and then exhale when bringing the weight back up. Ensure you don’t hold your breath throughout – breathe rhythmically to avoid dizziness since your head position can be below your torso in this exercise.
Common Mistakes:
Excessive Range/Shoulder Stress: The pullover can put stress on the shoulders if you lower too far or relax your shoulders at the bottom. Only go as far as you can while keeping shoulders feeling secure. If you feel sharp shoulder pain or your elbows start flaring way out, you’ve gone too deep. Maintain a slight depression of your shoulder blades (don’t let them completely unpack at bottom). Overstretching is a common mistake – more isn’t always better if form breaks down.
Hips Dropping (if cross-bench): When doing the cross-bench style, some let their hips sink too low, which hyperextends the lower back. Keep your hips up, inline with your torso (like a bridge) to avoid undue back arching. This also keeps tension where it should be – on your muscles, not on your spine.
Bent Arms Turning it Into a Press: If you bend your elbows a lot on the way down and then extend them, you’re doing a kind of eccentric triceps extension – not the goal here. Keep the elbow bend constant. Too much bend turns the pullover into a sort of awkward triceps exercise, taking load off chest/lats. Conversely, locking out completely can strain the elbows and shoulders; maintain that slight bend throughout.
Using Momentum: Lowering the weight too quickly and then bouncing it back up using elastic recoil or arching the back is cheating. The movement should be smooth and muscle-controlled, especially in the stretched position. If you can’t control the descent, the dumbbell is too heavy.
Not Engaging Core (Rib Flaring): It’s easy to let your ribcage jut up on the stretch – this is your body trying to reduce the strain on the target muscles by shifting it to your spine. Don’t let it. Keep your ribs “down” and core tight, as if doing a mini crunch, throughout the rep. If someone were watching, they shouldn’t see a big gap develop between your lower back and the bench or your ribs poking up dramatically.
Poor Head/Neck Support: If lying cross-bench, ensure your neck isn’t straining. Your head can be slightly tilted back in line with your spine. If it feels uncomfortable, try the along-bench method (full back supported) or put a pad under your neck.
Suggested Rep Ranges:
Beginner: 2–3 sets of 10–12 reps with a light-moderate weight (maybe an empty/light dumbbell to start). Focus on form and shoulder comfort. This isn’t an exercise to go very heavy on initially. Feel the stretch and ensure no joint pain.
Intermediate: 3 sets of 8–12 reps with a moderate weight. At this stage, you can experiment with technique to target chest vs. lats – e.g., if you want more chest, keep elbows wider and stop when hands are over chest; for more lats, tuck elbows a bit and emphasize the initial pull from behind head. The last few reps should be challenging but not compromising your form.
Advanced: 3–4 sets of 6–10 reps with a heavier weight or 2–3 sets of high reps (~15) for a deep stretch effect. Advanced lifters might use pullovers as a finisher for chest or back day, going for a pump and stretch (15+ reps with lighter weight), or as a heavy compound (6–8 reps) where you really test your strength while staying controlled. Superset idea: pair pullovers with push-ups or rows for an intense upper-body superset. Always prioritize shoulder safety – if going heavy (like using a very heavy dumbbell or even a barbell/EZ-bar pullover), ensure your shoulders are thoroughly warmed up and consider using a spotter to hand you the weight.
6. Landmine Press
The landmine press is a versatile upper-body pressing exercise performed with one end of a barbell anchored to the floor (often in a landmine attachment or simply wedged in a corner). You lift the free end of the barbell in a pressing motion somewhere between an overhead press and an incline press. The landmine press is typically done one-arm at a time, either standing or kneeling. This unique setup offers a shoulder-friendly pressing angle and engages your core significantly. Compared to a traditional military press, the bar path is at a slight forward angle, which can be more comfortable for those with shoulder mobility issues. Landmine training provides a unique range of motion, is known to be joint-friendly, and because it’s often done unilaterally (one side at a time), it bolsters shoulder stability and unilateral strength. If standard overhead presses cause you pain or you want to hit your shoulders and upper chest in a new way, the landmine press is a gem that often flies under the radar.

Primary Muscles Worked: Anterior deltoids (front shoulders) are the prime movers, along with the upper pectorals (upper chest/clavicular head) due to the angled press. The triceps extend your arm to press the weight up. The trapezius and serratus anterior help stabilize the shoulder blade through the motion. Because this is commonly done one-handed, the obliques and other core muscles fire to prevent you from bending or rotating, and your glutes and legs engage to provide a solid base (especially when standing). In short, it’s mainly a shoulder and upper chest exercise with significant assistance from arms and core.
Why It’s Underrated: Gym-goers often default to the barbell or dumbbell overhead press for shoulder development, forgetting about this variation. The landmine press requires setting up a bar in a landmine device or corner, which some might find inconvenient. It’s also not a “classic” lift that’s in many beginner programs, so unless a trainer or resource exposes you to it, you might not think to include it. Additionally, because the landmine press uses a fixed path and often lighter weight (you generally can’t press as much as a two-handed barbell press), some may mistakenly view it as less effective. In reality, it’s an incredibly effective and safer way to build strong shoulders and a strong core simultaneously. It just doesn’t get the hype of the big barbell lifts, making it an underutilized secret weapon.
Key Benefits:
Shoulder-Friendly Pressing: The landmine’s angled movement allows your scapula (shoulder blade) to move freely and puts less strain on the shoulder joint. Many people who feel pain in straight overhead presses find the landmine press much more comfortable. It’s great for those rehabbing shoulders or anyone with limited overhead mobility.
Builds Delts and Upper Chest: Because of the forward angle, you hit your front deltoids and upper chest together. It’s a fantastic exercise for the anterior shoulder and upper pecs, giving you that armored upper-body look. You can also adjust your press angle (more upright vs. more diagonal) to shift emphasis slightly.
Core and Stability: Pressing one arm at a time with a landmine forces your torso to resist bending sideways. Your abs, obliques, and lower back work to keep you stable. Also, balancing the bar path (so it doesn’t waver) engages smaller stabilizer muscles. In effect, you’re doing a core workout while you press.
Unilateral Strength & Symmetry: Working one side at a time helps address any left-right strength differences. It also mimics real-life and sport movements where you often push with one arm (e.g., bracing in a fall, pushing an opponent). Training unilaterally can improve balance and coordination.
Versatility: The landmine press can be done kneeling, standing, split-stance, two-handed (Viking press style), etc., to suit your needs. It’s also easy to learn for beginners – the bar’s fixed end guides your path, making it more stable than a free weight overhead press. Plus, you don’t need a ton of weight to get benefits, so it can be safer for solo training.
How to Perform: (Half-Kneeling Single-Arm Landmine Press)
Set Up Barbell: Place one end of a barbell into a landmine attachment or securely wedge it into a corner (with a towel to protect the wall). Load a weight plate on the free end as needed.
Starting Stance: For a single-arm press, assume a half-kneeling position: if you’re pressing with your right hand, kneel on your right knee and put your left foot forward flat on the floor (like a lunge stance). This staggered position gives stability. Square your hips and shoulders forward. If standing, you can stand with feet shoulder-width or slightly staggered.
Grip and Rack: Grasp the end of the barbell with your working side hand. Hold it just in front of your shoulder with the bar end near your collarbone. Your palm will be around the end of the bar, thumb pointing toward you or slightly up – whatever comfortable neutral grip you find. Keep your wrist straight (don’t let it excessively bend back). Tuck your elbow close to your body (around 30–45° away from your side). Engage your core, keep your torso upright, and gaze forward.
Press: Drive the barbell up and slightly forward. Because the bar is anchored, it will move in an arc. Extend your arm until it’s almost straight, ending at roughly a 45° angle from vertical (not straight overhead, not straight forward). Exhale as you press up. You should feel your shoulder and chest pushing, and your core tightening to prevent leaning back.
Lockout and Control: At the top of the press, your arm should be extended in line with the bar’s path (not necessarily locked out vertically). Don’t shrug your shoulder up; keep it down. Pause briefly when your arm is extended and the weight is supported strongly by your shoulder and arm.
Lowering: Inhale and slowly lower the bar back to the starting “racked” position at your shoulder. Control it all the way down; imagine you’re resisting it rather than just dropping it. Your elbow comes back to your side. That’s one rep.
Repeat and Switch: Do the desired reps on one arm, then switch to the other arm (and opposite knee forward if half-kneeling). Maintain tight form on both sides – one side might be less stable; take time to set up each side correctly.
Variations: You can also perform this standing with a slight forward lean and knees soft. Two-arm landmine presses involve both hands on the bar – stand facing the landmine and press with both arms (often used if you lack overhead mobility). Adjust body position to target muscles: kneeling often isolates the upper body more, while standing allows some leg and hip drive (if you want to push more weight, almost like a shallow incline press).
Common Mistakes:
Poor Hand/Wrist Position: Gripping the bar incorrectly can hurt your wrist. Don’t hold the very end of the sleeve with a bent wrist under it (palm up) – this can strain the wrist as the bar pushes back. Instead, cup the end of the bar from the side with a neutral or slight pronated grip, and keep your wrist straight behind your fist. This gives you a strong pressing platform.
Flaring Elbow Out: While pressing, if your elbow flares too far out (away from your body), it can strain your shoulder and lose power. Keep the elbow closer to the ribcage as you initiate, then it can naturally angle out a bit. A roughly 45° angle from your side is a good target – not tucked completely, but not flared to 90°.
Arching the Lower Back/Rib Flare: Especially when kneeling, some lifters will arch back or stick their ribs out to help press, which indicates they’re compensating. This “rib flare” can reduce core engagement and lead to lower back stress. Keep your glutes tight and ribs down. Think of keeping a straight line from your knee (or feet) to your shoulders. If you find yourself arching, lighten the weight or tighten your abs more.
Pressing Too Vertically or Too Horizontally: The landmine press is a diagonal press. Pushing the bar straight up(trying to mimic an overhead press) or straight forward (like a chest press) isn’t ideal. The correct path is at about 35–45° angle– the bar moves up and forward. If you press too vertically, you may end up shrugging or straining the shoulder; too horizontally, and you turn it into more of a flat press. Let the natural arc of the landmine guide you.
Lack of Core Bracing: Because of the unilateral nature, you might lean your torso toward the working side or twist. Remember, half the benefit of this exercise is core anti-rotation and anti-lateral-flexion. Keep your abs and obliques braced so your body doesn’t bend or rotate. If standing, avoid leaning away from the bar (a slight lean into the bar is okay as you press, but keep it controlled).
Going Too Heavy at First: The landmine press typically uses less weight than a two-arm barbell press. If you overload the bar, you may end up awkwardly jerking your body or not achieving full range of motion. Start moderate; you can generate surprisingly intense muscle activation even with modest weight due to the leverage. As you perfect form, then increase the plates.
Suggested Rep Ranges:
Beginner: 3 sets of 8–10 reps per arm with an empty bar or light weight (like 10–15 kg). Focus on smooth movement and not using your legs or torso to heave the weight. Rest as needed when switching sides to maintain form.
Intermediate: 3–4 sets of 10–12 reps per arm with moderate weight. When this becomes easy, you can progress by adding small plates or even increasing complexity (e.g., from kneeling to standing single-arm presses). You might incorporate the landmine press once or twice a week on upper body days.
Advanced: 4 sets of 6–8 reps per arm (going heavier for pure strength focus) or 4 sets of 12–15 reps (for hypertrophy/endurance focus), depending on your goal. Advanced lifters can experiment with single-arm landmine push-press (using a bit of leg drive to press more weight for power), or do alternating presses (if using two arms, pressing one while the other stabilizes). If very comfortable, you could also try pressing from a standing position with feet together to make the core work harder. Whichever approach, ensure the last few reps are challenging but achieved with solid form.
7. Nordic Hamstring Curl
The Nordic hamstring curl (Nordic hamstring exercise) is a brutally effective bodyweight exercise for your hamstrings that has gained fame in sports training for its role in preventing injuries. In this exercise, you kneel on the ground with your ankles secured (by a partner or an anchor), then lower your torso forward under control, using your hamstrings to resist gravity. It’s essentially an eccentric hamstring curl – your hamstrings lengthen under load as you descend. Few exercises hammer the hamstrings’ lengthening strength like this. Research shows the Nordic curl can significantly improve hamstring strength and even reduce hamstring injury rates by up to 51% pmc.ncbi.nlm.nih.gov. Despite these benefits, you’ll rarely see it in a commercial gym, likely because it’s very challenging and not widely known outside athletic circles. However, with minimal equipment and big rewards, the Nordic curl is the underrated key to stronger, more resilient hamstrings.
Primary Muscles Worked: Hamstrings (biceps femoris, semitendinosus, semimembranosus) are the primary focus, especially emphasizing the eccentric (lengthening) phase. The hamstrings work to decelerate your body as you lower. The glute muscles assist at the hip (especially if you maintain a straight line from knee to shoulder). The calves (gastrocnemius) also assist because they cross the knee joint and help hamstrings in knee flexion, and they stabilize your lower legs under the anchor. Your lower back and core engage isometrically to keep your torso straight as you lower and lift.
Why It’s Underrated: The Nordic curl is often absent from typical bodybuilding or general fitness programs – there’s usually no machine for it (it’s often done with a partner or special setup), and it’s hard. Many people can’t do a full unassisted Nordic curl at first, so they might skip it rather than regress it. Gyms do provide leg curl machines, which train hamstrings in a more comfortable way, so the need to do this challenging bodyweight move is less obvious. It’s more popular among athletes (who prioritize injury prevention and eccentric strength) than among casual gym-goers. As a result, its incredible benefits on hamstring strength and durability are frequently missed by the average person’s training plan.
Key Benefits:
Hamstring Strength (Especially Eccentric): Nordics are unparalleled for building eccentric hamstring strength – the ability of your hamstrings to produce force while lengthening. This directly translates to more powerful and safe sprinting, jumping, and deceleration. You’re essentially bulletproofing your hamstrings; strong eccentrics mean less risk of strains when your hamstrings are stretched (like in sprinting).
Injury Prevention: This exercise has a mountain of evidence behind it in sports science. Regular Nordic curl training has been shown to dramatically cut the incidence of hamstring strains. If you’ve ever pulled a hammy or want to avoid that fate, Nordics are your friend. They strengthen the hamstring at longer muscle lengths (where injuries often occur).
Posterior Chain Development: Besides isolation movements, few bodyweight exercises target the hamstrings as directly. The Nordic curl helps round out your posterior chain training which often focuses more on glutes and lower back (via deadlifts, hip thrusts, etc.). Stronger hamstrings also support knee health and can improve your lifts (strong hams aid your deadlift lockout and squat stability).
No Equipment Needed: Aside from something to anchor your feet, Nordics don’t need machines or weights. This makes them accessible for home workouts. You can hook your feet under a heavy piece of furniture, a barbell loaded with plates, or have a partner hold your ankles. There are even Nordic curl boards and straps you can use if training solo. For those with limited equipment, this exercise is a godsend for hitting hamstrings hard.
Core and Calf Engagement: While the hamstrings do the lion’s share, your calves and core get ancillary benefits. You must keep your trunk rigid (working abs and spinal erectors) and your ankles actively plantarflexed (to push against the anchor, hitting the calves). So you get some trunk and lower leg work as a bonus.
Progression of Difficulty: Nordics start hard, but they have many regression and progression options. This means they can continually challenge you as you improve. Beginners can start with partial range or band assistance; the strongest can add weight or do advanced variations (like single-leg eccentrics).
How to Perform:
Setup: You’ll need a padded surface for your knees (a mat or cushion) and something to hold your feet down. Ideally, have a partner firmly hold your ankles or use a fixed bar/railing + padding over it. Your feet should be anchored just above the heels, so your ankles stay down. Begin in a tall kneeling position: knees on the pad, torso upright, thighs and torso in a straight line (imagine from shoulders to knees is one straight plank). You can cross your arms over your chest or hold them out in front of you ready to catch yourself.
Execution (Lowering): Keeping your body straight from head to knee, slowly lower your torso forward toward the ground. Think of it as your hamstrings acting like the brakes. Fight against gravity as long as possible – you’ll feel intense tension in the back of your thighs. Keep your hips extended (don’t bend at the waist); the movement is happening at the knees. Try to go down as far as you can under control. Most people initially can only go a little forward before collapsing – that’s okay. Go as slowly and as far as your strength allows. The moment you can no longer hold yourself, let yourself fall into a push-up position and catch yourself with your hands.
Return (Concentric or Assist): For most, the concentric (lifting back up) will be impossible unassisted. The standard method: use your arms to lightly push off the ground enough to get yourself started back up, and then pull with your hamstrings to return to kneeling. Essentially, do an “assisted push-up” to cheat yourself back up. If you’re strong enough, you can attempt to curl your hamstrings and pull yourself up without push assistance – that’s the ultimate goal (a full Nordic curl up), but it’s extremely advanced. Whether you push or not, squeeze your hamstrings and glutes to bring your body back to upright.
Reset and Repeat: That sequence (controlled fall, catch, push back up) is one rep. Reset your body straight and repeat for the next rep. Maintain tension in your hamstrings even as you reset if possible. Throughout reps, avoid bending at the hips; your body should remain like a straight plank from knees to head.
Breathing: Inhale as you prepare and begin lowering. Exhale if you’re exerting to come back up. Many find holding breath on the way down (to stay tight) then exhaling on the way up works well. Just don’t hold your breath so long that you get lightheaded – there’s a lot of strain, so remember to breathe.
Assistance Tips: In the beginning, use a resistance band tied in front of you: loop it around your chest or arms, anchored above (like on a pull-up bar) to help hold some of your weight as you descend. This can greatly assist and allow full range with good control. Over time, use lighter bands until you need none. You can also do partials: lower to a point, then pull back up from there, gradually increasing range as you get stronger.
Common Mistakes:
Bending at Hips: The most frequent mistake is hinging at the hips (butt goes back) as you lower, which makes it easier because you’re not fully using the hamstrings to control the descent. This turns it into a bit of a hip extension. Focus on keeping that straight line from knee to head – no jackknifing. Imagine a board from your shoulders to knees and you’re tipping it forward.
Not Controlling Eccentric: Simply dropping and catching defeats the purpose. Even if you can only lower a few inches under control, that’s fine. Go slow. The magic is in the slow eccentric loading of the hamstrings. If you find you’re plummeting, use a band or have your partner support you more on the way down.
Inadequate Foot Anchor: If your feet are not well-secured, they’ll pop up and you’ll lose stability or even faceplant. Ensure whatever holds your ankles is secure and doesn’t move. If a partner is anchoring, they should apply downward pressure on your lower legs and can even lean a bit onto your heels.
Neck or Back Hyperextension: Keep your head and spine neutral. Don’t crane your neck up excessively or let your lower back sag. A rigid body means even the tiny posture muscles are engaged, and it prevents strain. Looking slightly down as you lower (as if to where you’ll land your hands) can keep neck in line.
Too Much Too Soon: Trying to perform a full unassisted Nordic right away can be discouraging or lead to hamstring cramps. It’s okay to use assistance (bands, partial reps) – that’s not a cheat, it’s a progression. Gradually challenge yourself with less assistance. Going to failure on Nordics (where you can’t catch yourself) could risk injury; always maintain some control. Remember, even the negatives (eccentrics) are very taxing; you might feel deep soreness (DOMS) a day or two after – this is normal, but ease in gradually to avoid excessive soreness that hampers your other training.
Suggested Rep Ranges:
Beginner: Start with 2 sets of 3–5 controlled lowers (eccentrics) only. It might be just a partial range. Use a band for assistance if needed. Treat each rep with quality over quantity. As you get comfortable, increase to 3 sets of 5–6 reps. In the beginning, do this only 1–2 times a week, since the hamstring soreness can be significant as they adapt.
Intermediate: 3 sets of 6–8 reps. By now you might be controlling a larger range of motion and needing less assistance. You could aim for something like a 3-second lower on each rep. If you can, start to perform a light push and hamstring pull to come up (even if most of the work is arms on the way up). Twice per week training is viable (e.g., part of leg days), ensuring you have recovery in between.
Advanced: 3–4 sets of 8–10 reps unassisted eccentrics, or if you’ve achieved it, 3–4 sets of 4–6 full Nordic curls(down and up without assistance) – that’s a tremendous level of strength. Advanced athletes might also add load (holding a plate to the chest or wearing a weighted vest) or do slow negatives (taking 5-6 seconds to descend) for fewer reps (e.g., 5 reps of very slow lowers). Another advanced approach is to increase frequency slightly (3x a week) but with low volume each time, to keep hamstrings continuously adapting. Always prioritize form – even advanced folks keep a keen eye on avoiding hip bend and using full range. As an advanced accessory, the Nordic curl will ensure your hamstrings are not the weak link in any athletic endeavor.
Closing Summary
Don’t let these underrated exercises fool you – each of these seven moves can deliver outsized results for your strength, muscle growth, and overall fitness. They’ve earned their place in the routines of savvy lifters: from the brutal quad burn of Bulgarian split squats to the core-shaking stability challenge of the Pallof press, these exercises target important muscles that traditional programs often miss. By incorporating even a few of these into your weekly workouts, you’ll shore up weak links (hello, rear delts and hamstrings!), improve functional strength, and reduce injury risk. Remember to start light, master the proper form, and progressively increase the challenge. Your body will quickly feel the difference – stronger lifts, better posture, and new muscle development.
Finally, approach these new exercises with an open mind and some patience. They might feel awkward or tough at first (especially that Nordic curl!), but stick with them. The payoff – healthier joints, balanced muscle development, and real-world strength – is well worth the effort. So next time you hit the gym, venture beyond the usual routine and give these “underrated” exercises a try. Your future fitter self will thank you for it! Keep training hard and smart, and enjoy the big results from these hidden gems in your workout arsenal.
References
National Strength and Conditioning Association (NSCA) – Bulgarian Split Squat benefits and technique
Journal of Strength and Conditioning Research – Efficacy of Farmer’s Walks for full-body strength
American Council on Exercise (ACE) – Face Pulls for shoulder health and posture
Journal of Sports Science and Medicine – Pallof Press as an anti-rotation core training method
T Nation / Bodybuilding.com – Dumbbell Pullovers for chest and lat development
Stronger by Science – Landmine Press benefits for shoulder-friendly pressing
British Journal of Sports Medicine – Nordic Hamstring Curl and injury prevention
Examine.com – Exercise form and common mistakes overview
Precision Nutrition – Exercise programming for all fitness levels